Ticket Interceptors
This documentation provides a compressive guide to Kodaris ticket interceptors, their usage and best practices. The article focuses particularly on those interceptors that are related to the ticketing system.
Overview
Ticketing system's workflow is configured via following interceptors:
- ticketSystemCustomerPreAdd.js
- ticketSystemPatchTicket.js
- ticketSystemPostNote.js
- ticketSystemPostTicket.js
- jiraIssueInsertFromKodarisTicket.js
- processDefaultEmail.js
What is an Interceptor?
An interceptor is a JavaScript-based middleware component that is executed within the Kodaris system during specific events or triggers.
Interceptor serves as event listener that respond to specific system operations, allowing developers to implement custom business logic on top of the core system code.
The Operations Portal provides a centralized interface for managing these interceptor configurations.
Follow these steps to locate interceptors in the Kodaris system:
- In the Operations Portal, navigate to the 'Interceptors' screen.

To access the Interceptors screen, employee must have one of these roles:
- administrator
- superuser
- scriptEdit
- scriptView
- Locate a specific interceptor using the search feature

- Click the arrow next to the interceptor to view its content
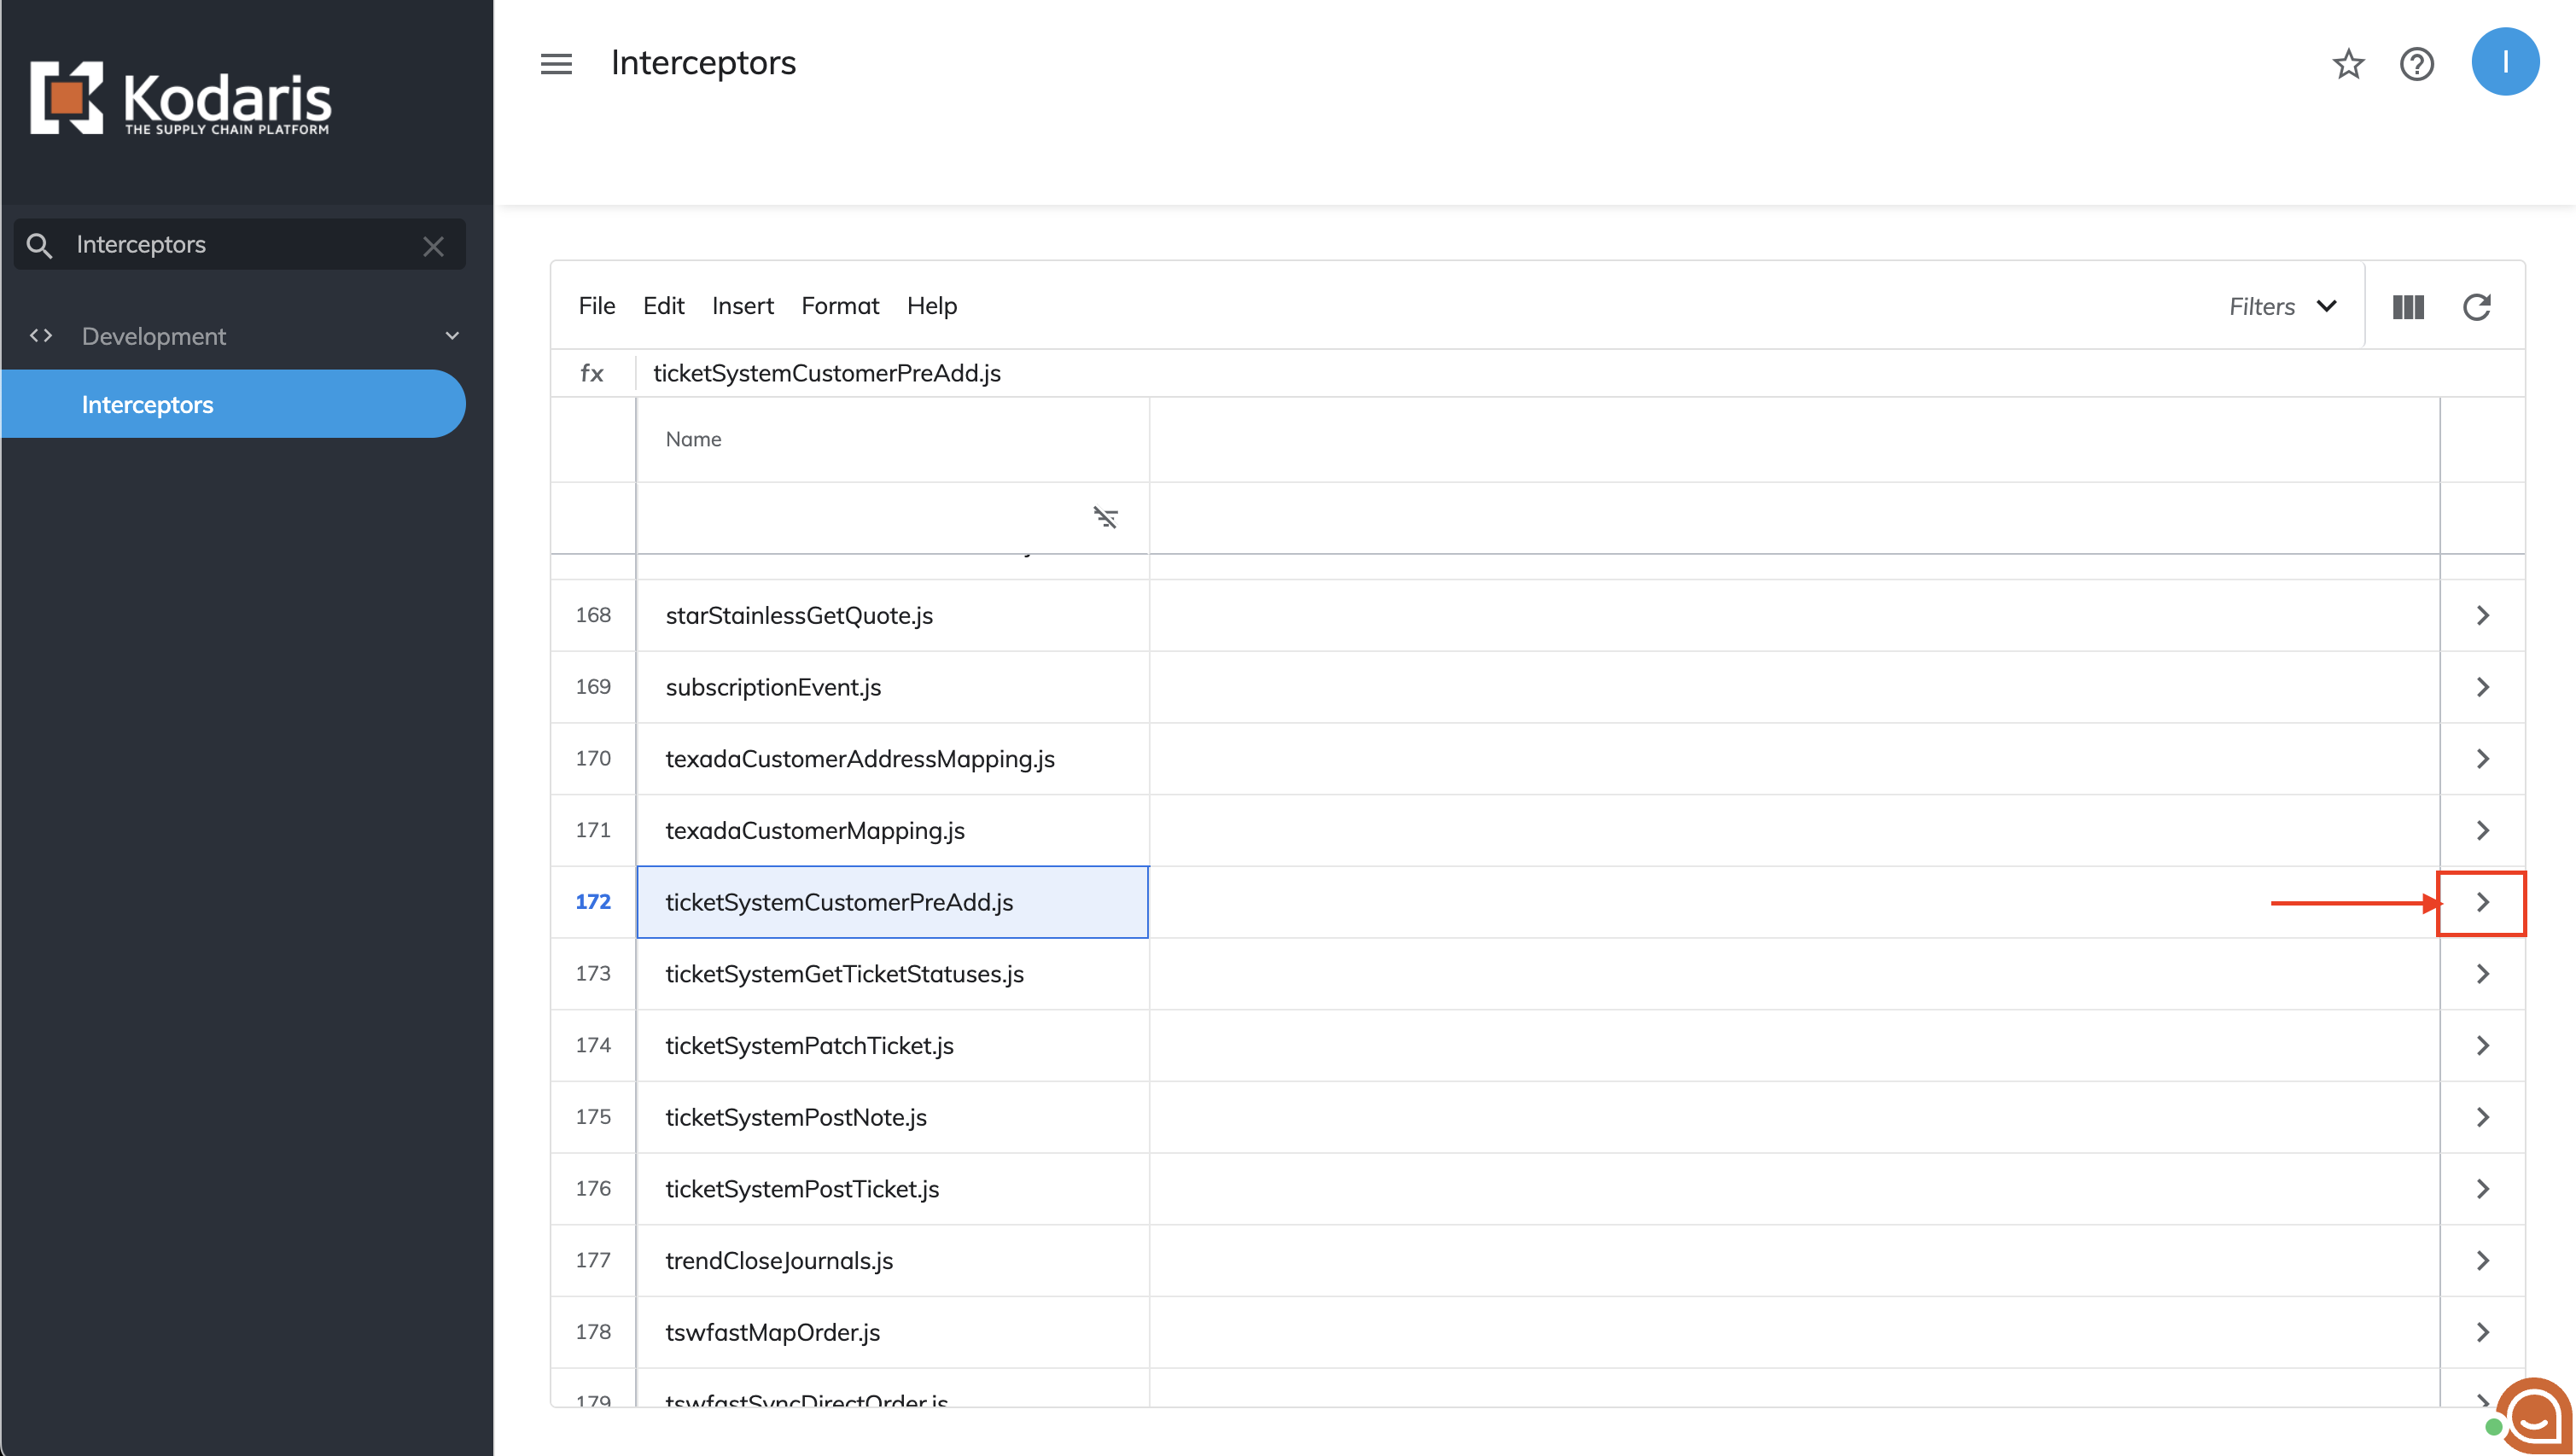
Interceptor Detail page
The details page contains two tabs: 'Editor' and 'Revisions'. In the 'Editor' tab, you can write and modify the interceptor's code.

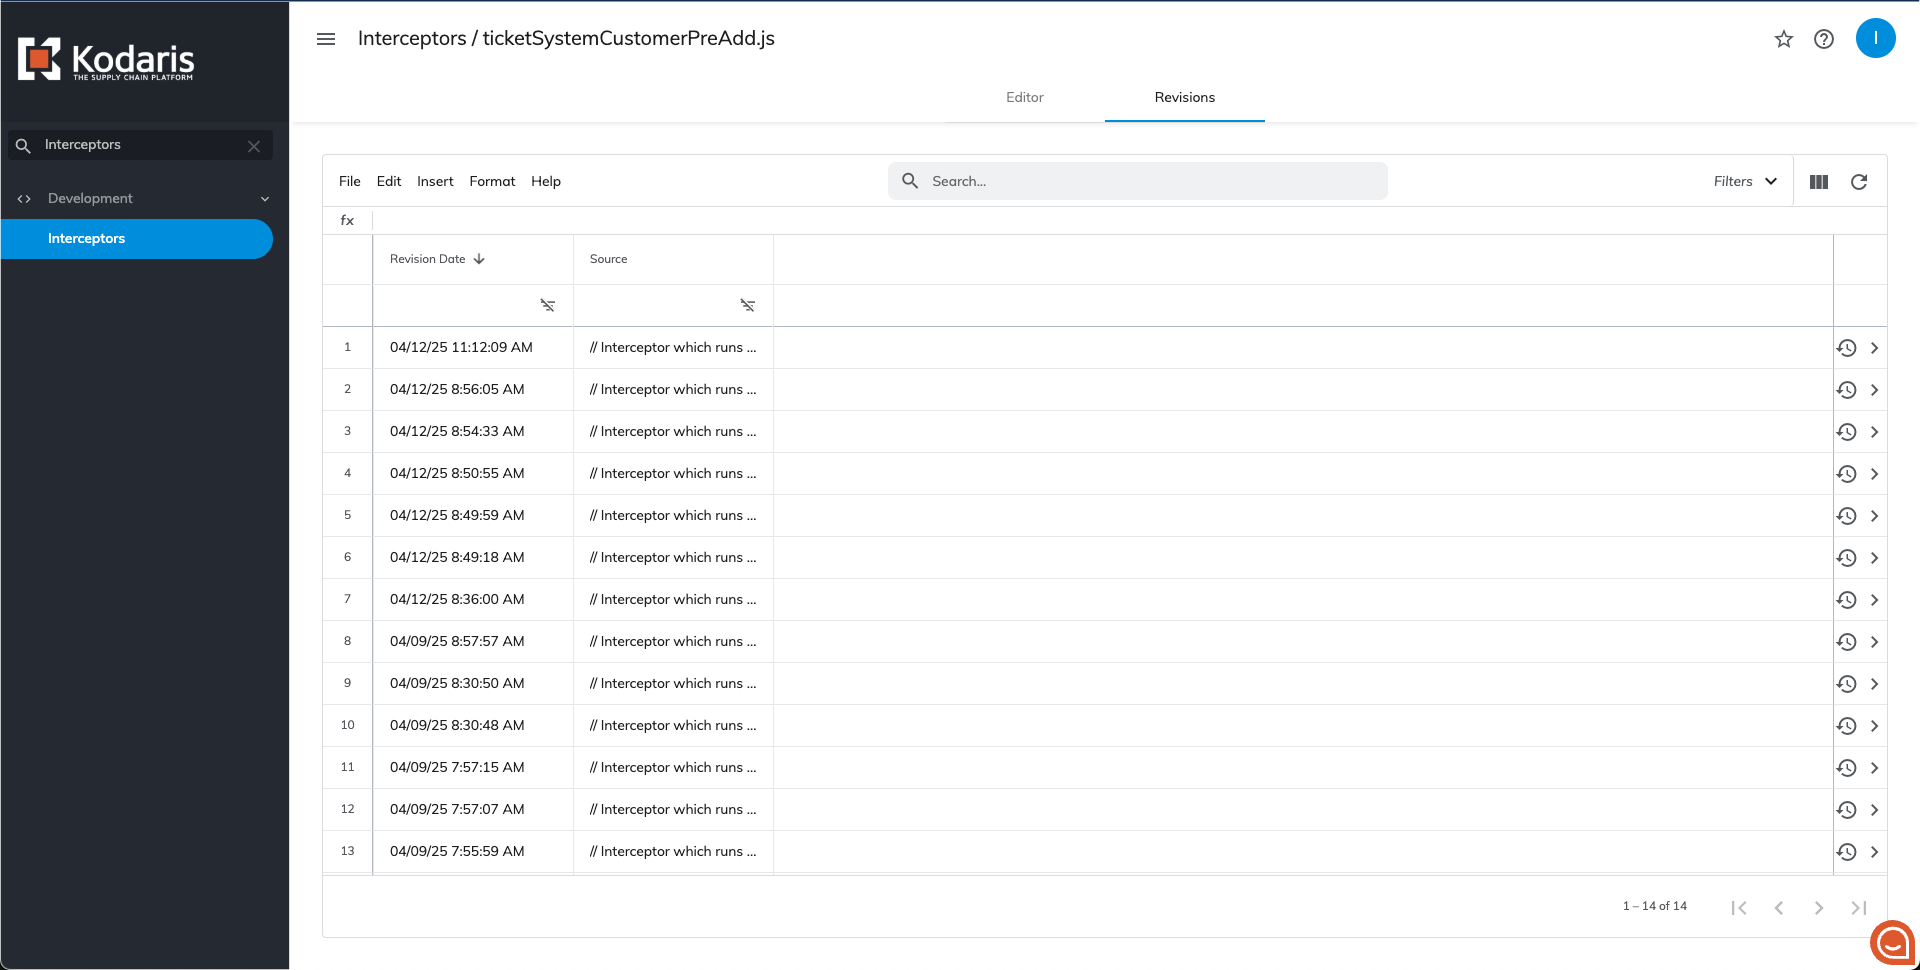
The 'Revisions' tab allows you to:
- View previously saved versions of the interceptor
- Review changes made over time
- Restore any previous version when needed
This feature is not enabled by default. To enable saving interceptor's revisions you need to
- Navigate to the 'Settings' screen.

- Search for the setting
saveInterceptorRevisionToDataLake.

- Click the arrow next to the found setting.

- Update the value field from 0 to 1

- Click the "Save" button to apply changes.

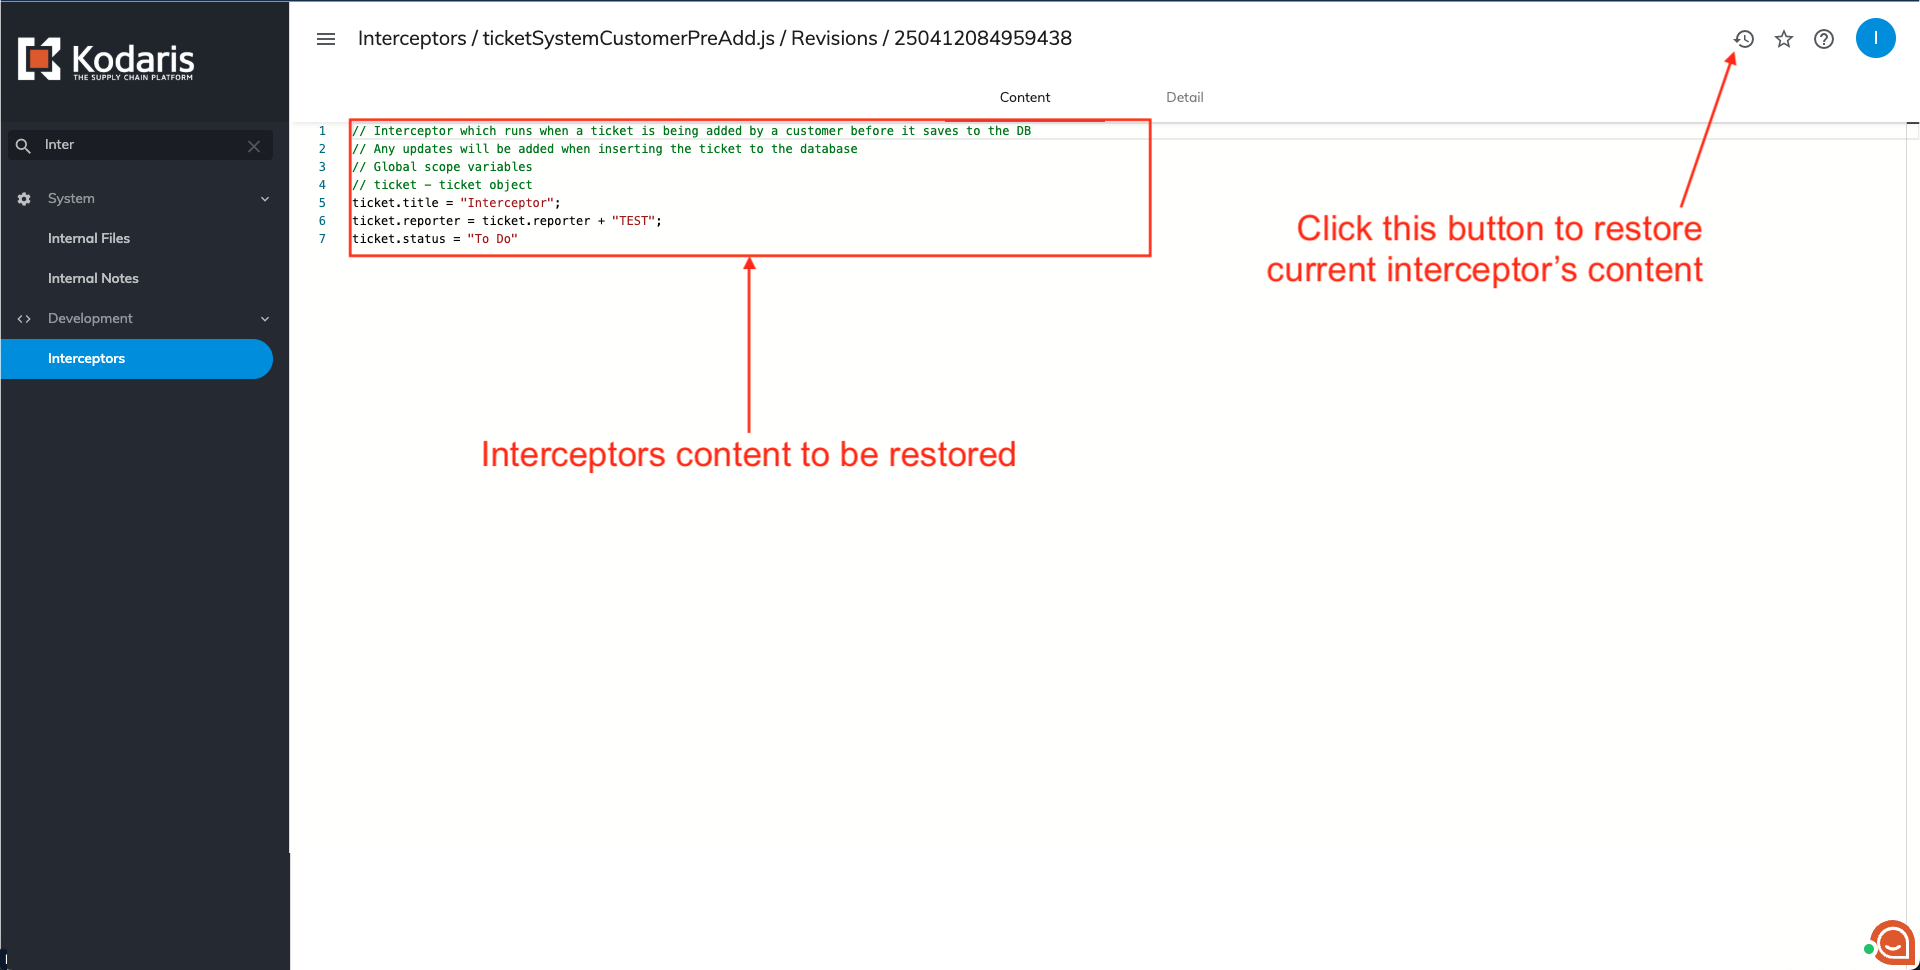
All revisions for the specific interceptor are stored in the 'Revisions' tab. To view revision content, click the arrow next to the revision you are interested in. To restore a previous version of the interceptor, click the circular arrow icon next to the revision.

If the selected revision is the one you need, click the circular arrow button in the top right corner. This will apply the selected code to the current version and navigate you to the 'Editor' tab where you can continue working.
Enabling the revision restore functionality is strongly recommended. Since interceptors are integrated into the Kodaris system code, any errors in the interceptor could cause system issues. This might result in failed events or improper execution, making the ability to restore previous working versions crucial.
The above functionality is common across all interceptors, but they differ in when and how they are executed.
The following chapters detail the specific features and implementation of each interceptor type.
ticketSystemCustomerPreAdd.js
Execution
Swagger
The ticketSystemCustomerPreAdd.js interceptor is triggered when calling the following Kodaris API endpoint: /api/account/ticket/company/{companyID}

Customer portal
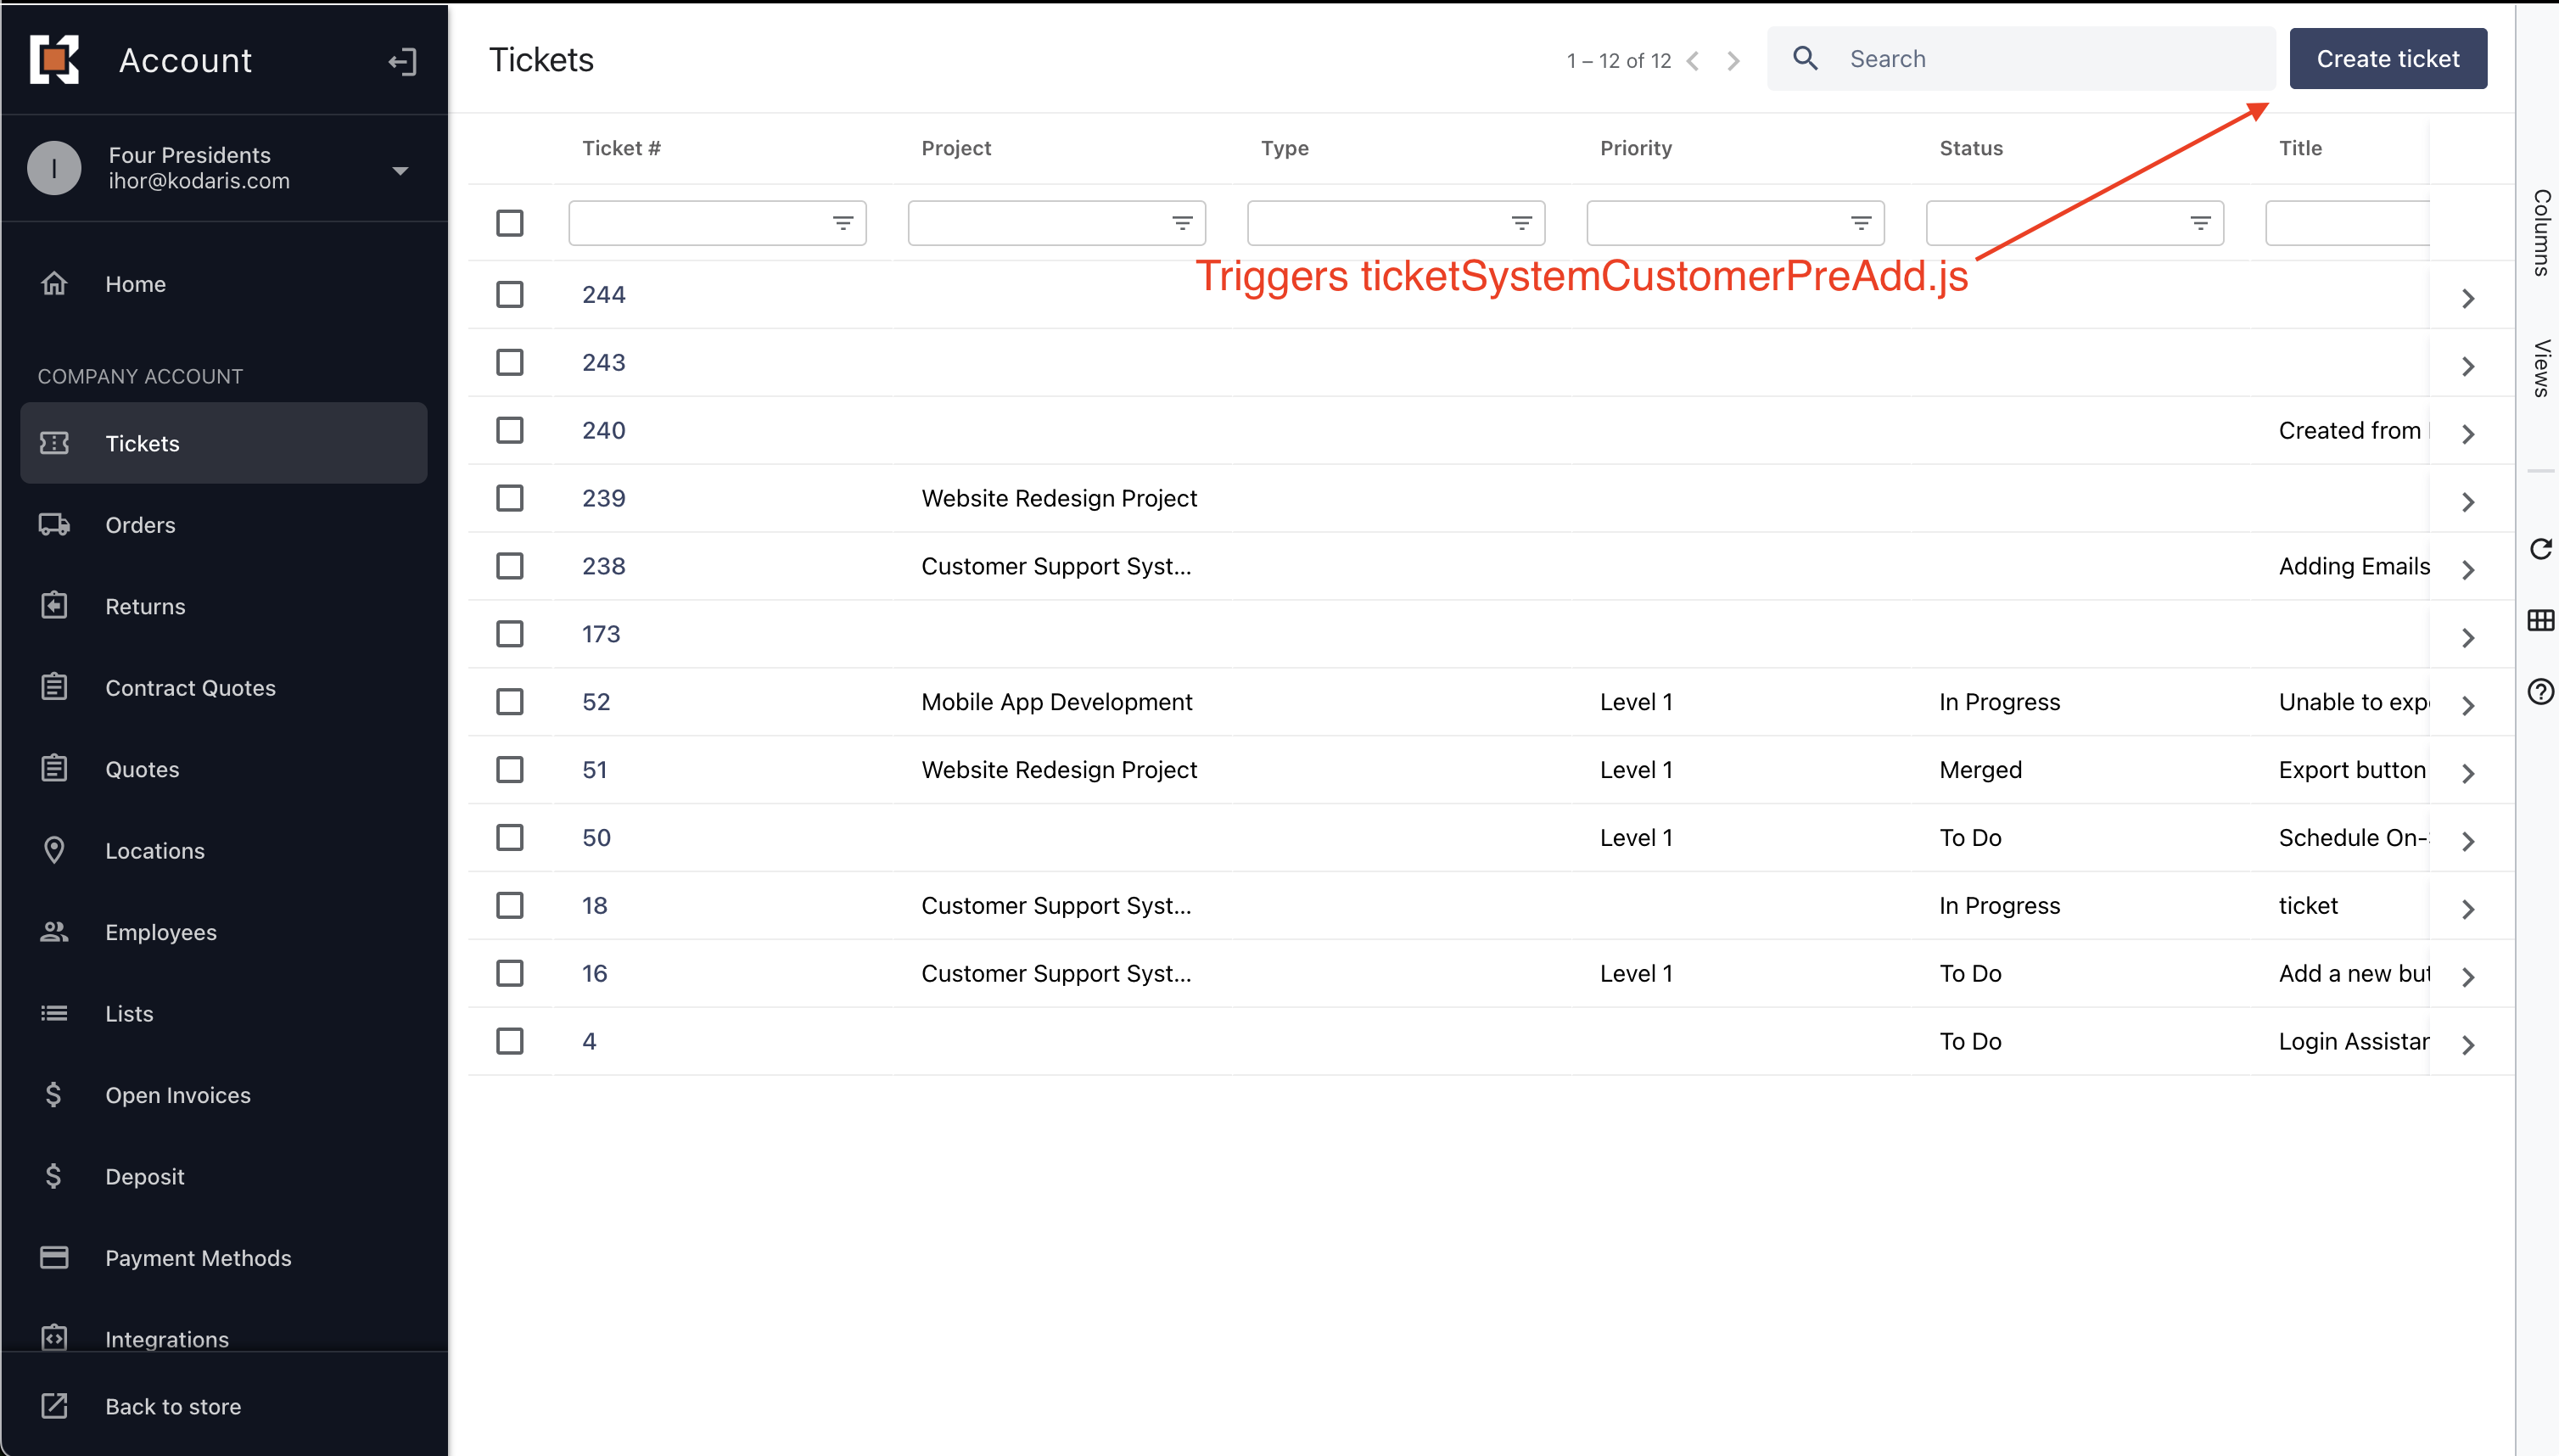
When creating a new ticket in the customer portal, the system automatically triggers this interceptor. Follow these steps to create a ticket:
- Select 'Tickets' from the left-hand navigation panel;
- Click the 'Create Ticket' button on the Tickets screen;
- Once the ticket is created, you will be automatically redirected to the ticket details page.
Roles
To create a new ticket in the customer portal, your user account must have at least one of the following roles:
- Company Administrator (
companyAdmin); - Ticket Editor (
editTickets).
Pre-Execution
Before the ticketSystemCustomerPreAdd.js interceptor is triggered, the system performs the following steps:
Initial state
The table below lists all ticket fields that are configured by default:
| Field | Value |
|---|---|
| Last Modified Created | Time when users creates the ticket |
| Creator Reporter CreatedBy | User that creates the ticket |
| Display to Customer | Yes(True) |
| Type | Ticket |
| Status | Empty value (clears any values out) |
After these configurations are applied, the ticket object is passed to the interceptor where it can be further modified.
Goal
This interceptor's primary purpose is to modify tickets created through the customer portal. Out of the box, the interceptor contains only commented code with implementation instructions.

Within the ticketSystemCustomerPreAdd.js interceptor, you have access to the 'ticket' object, which represents the ticket record in the Kodaris system. Any modifications made to this object will be automatically saved to the ticket record.
Post-execution
The system saves all modifications made by the ticketSystemCustomerPreAdd.js interceptor as a new ticket record in the Kodaris database.
Example
The following code snippet demonstrates how to modify the ticket's title, reporter, and status for all tickets created through the customer portal.

Upon ticket creation, the user is automatically redirected to the ticket details page where they can view all applied modifications.

While the status field is modified by this implementation, it is not displayed in the ticket details page but is visible on both:
- The customer portal tickets screen

- The operations side.

The following code snippet can be used to run the same tests on the system:
ticket.title = "Interceptor";
ticket.reporter = ticket.reporter + "TEST";
ticket.status = "My custom status"
ticketSystemPatchTicket.js
Execution
Swagger
This interceptor executes when a user makes a request to the /api/system/ticket/{ticketID} endpoint.
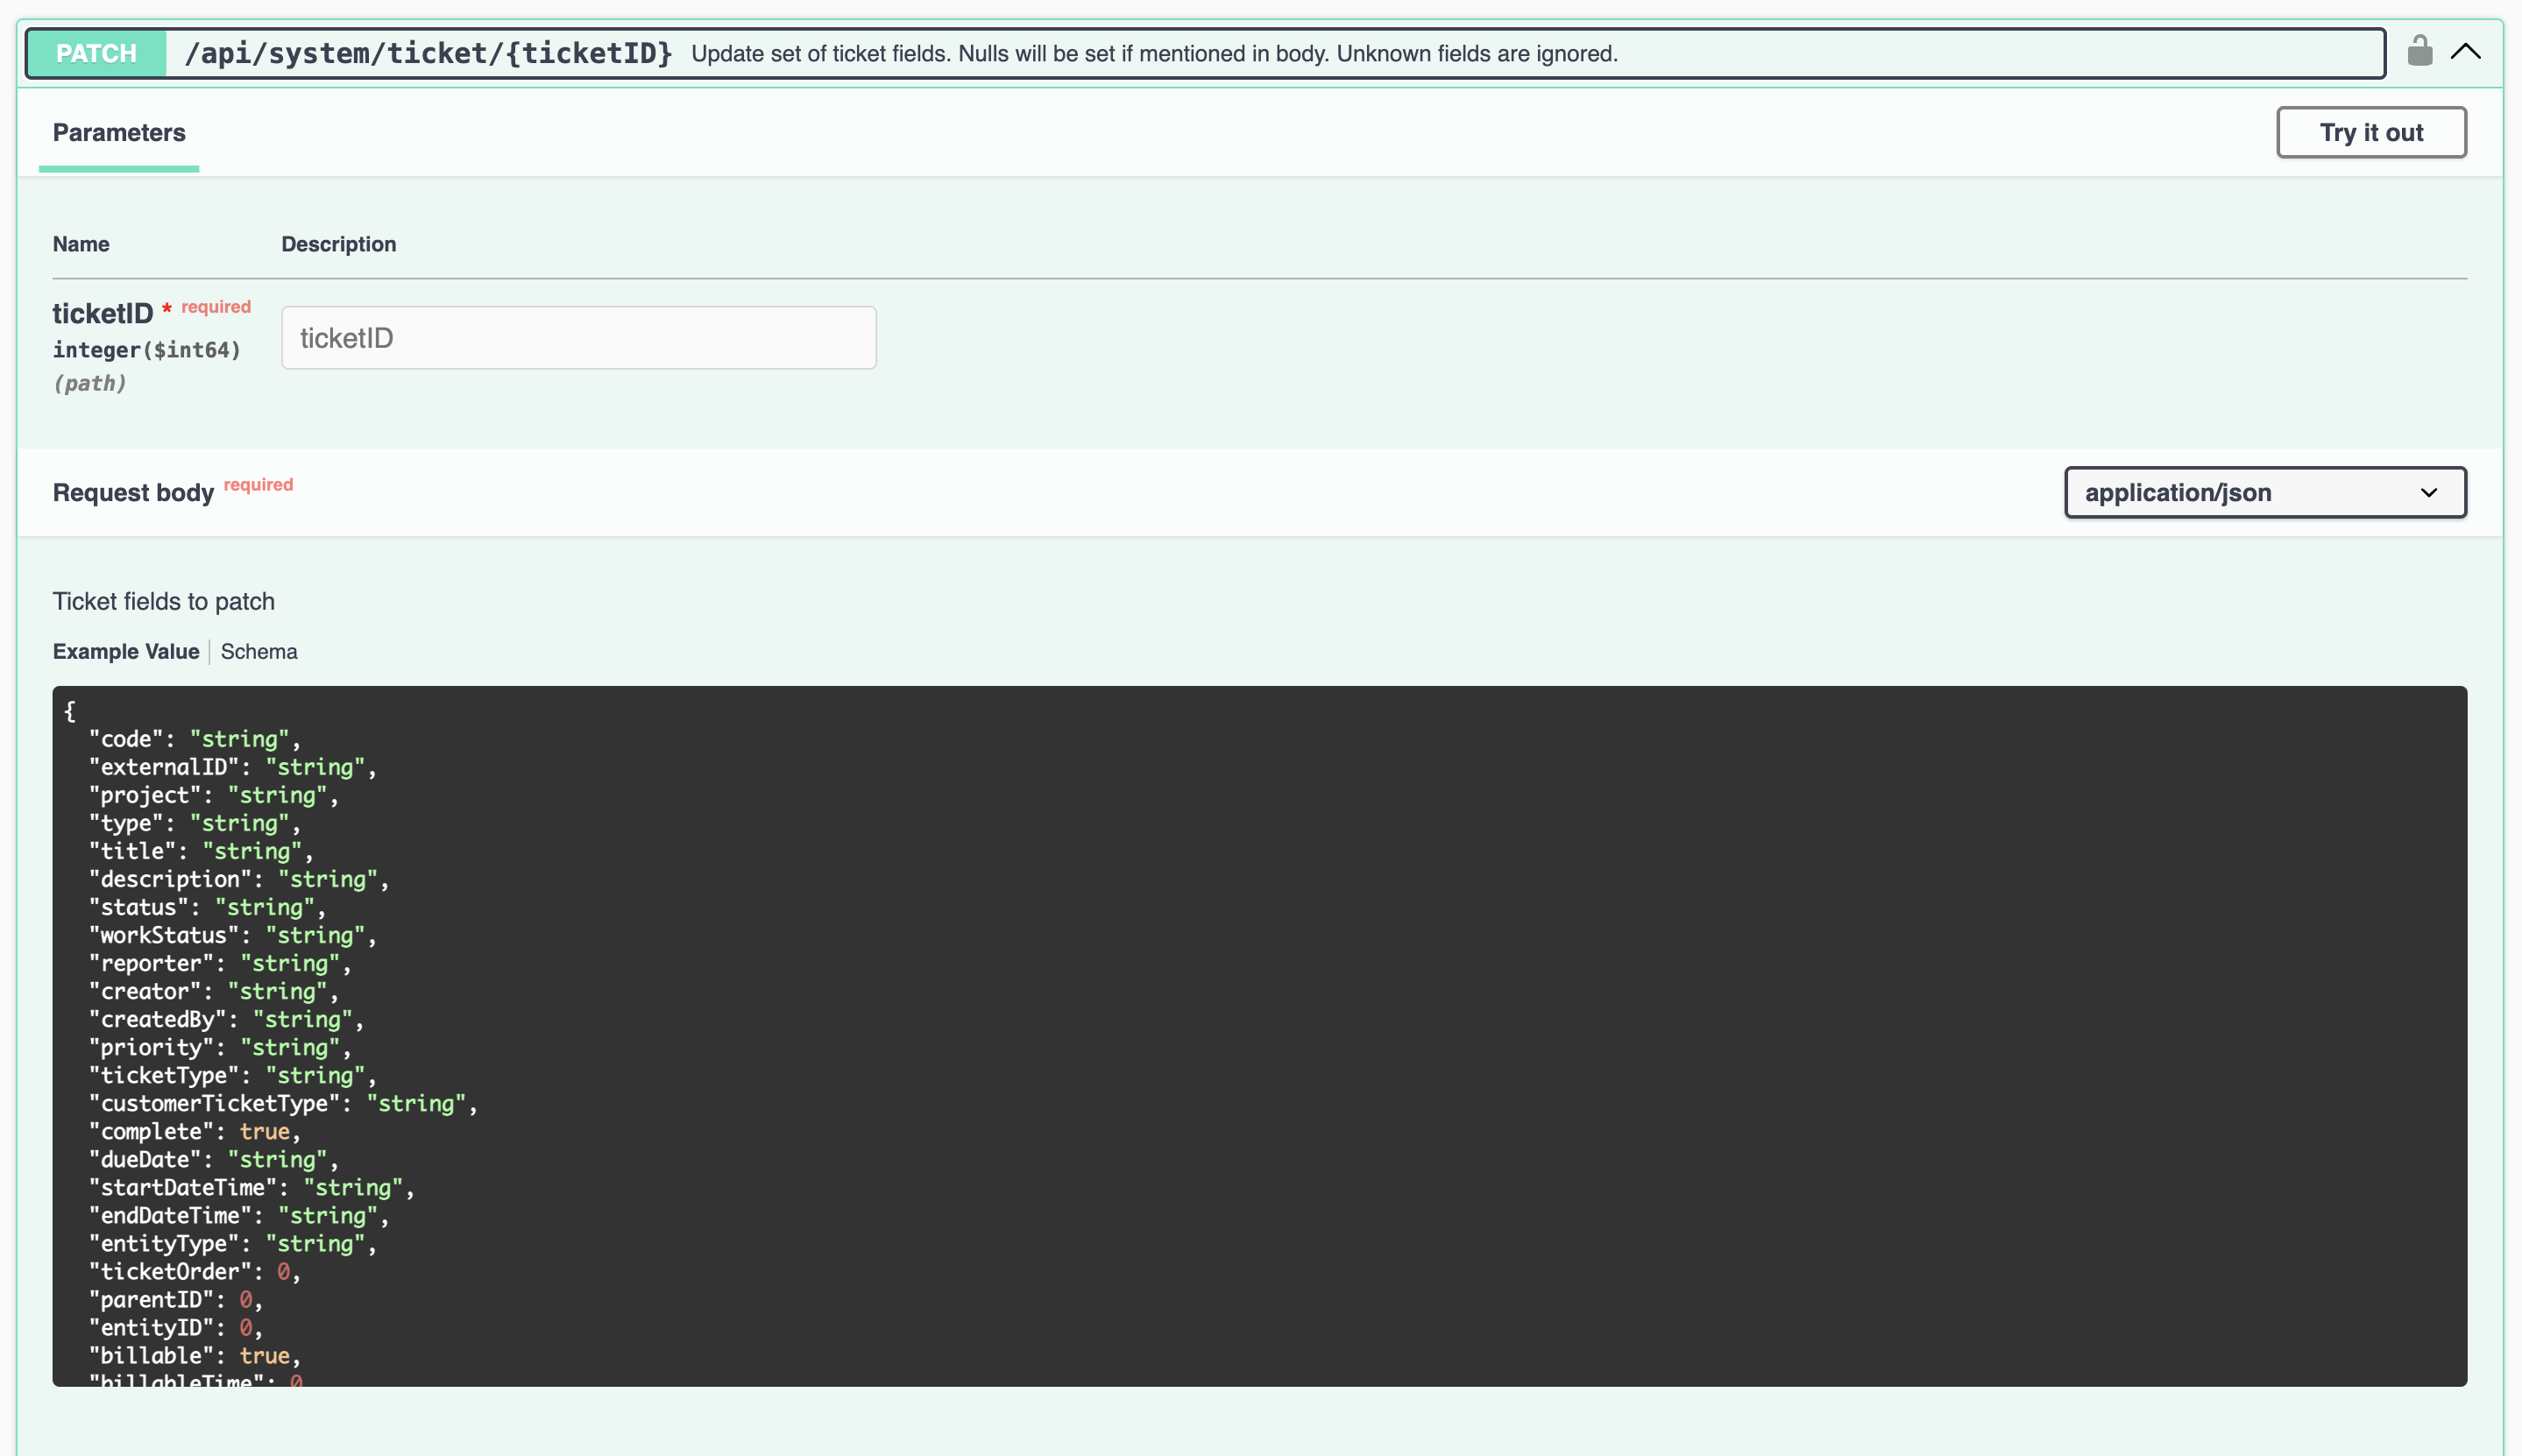
Parameters:
- ticketID (path parameter) - the unique identifier of the ticket in your Kodaris system;
- request body - Fields of the ticket record to be modified.
Operations portal
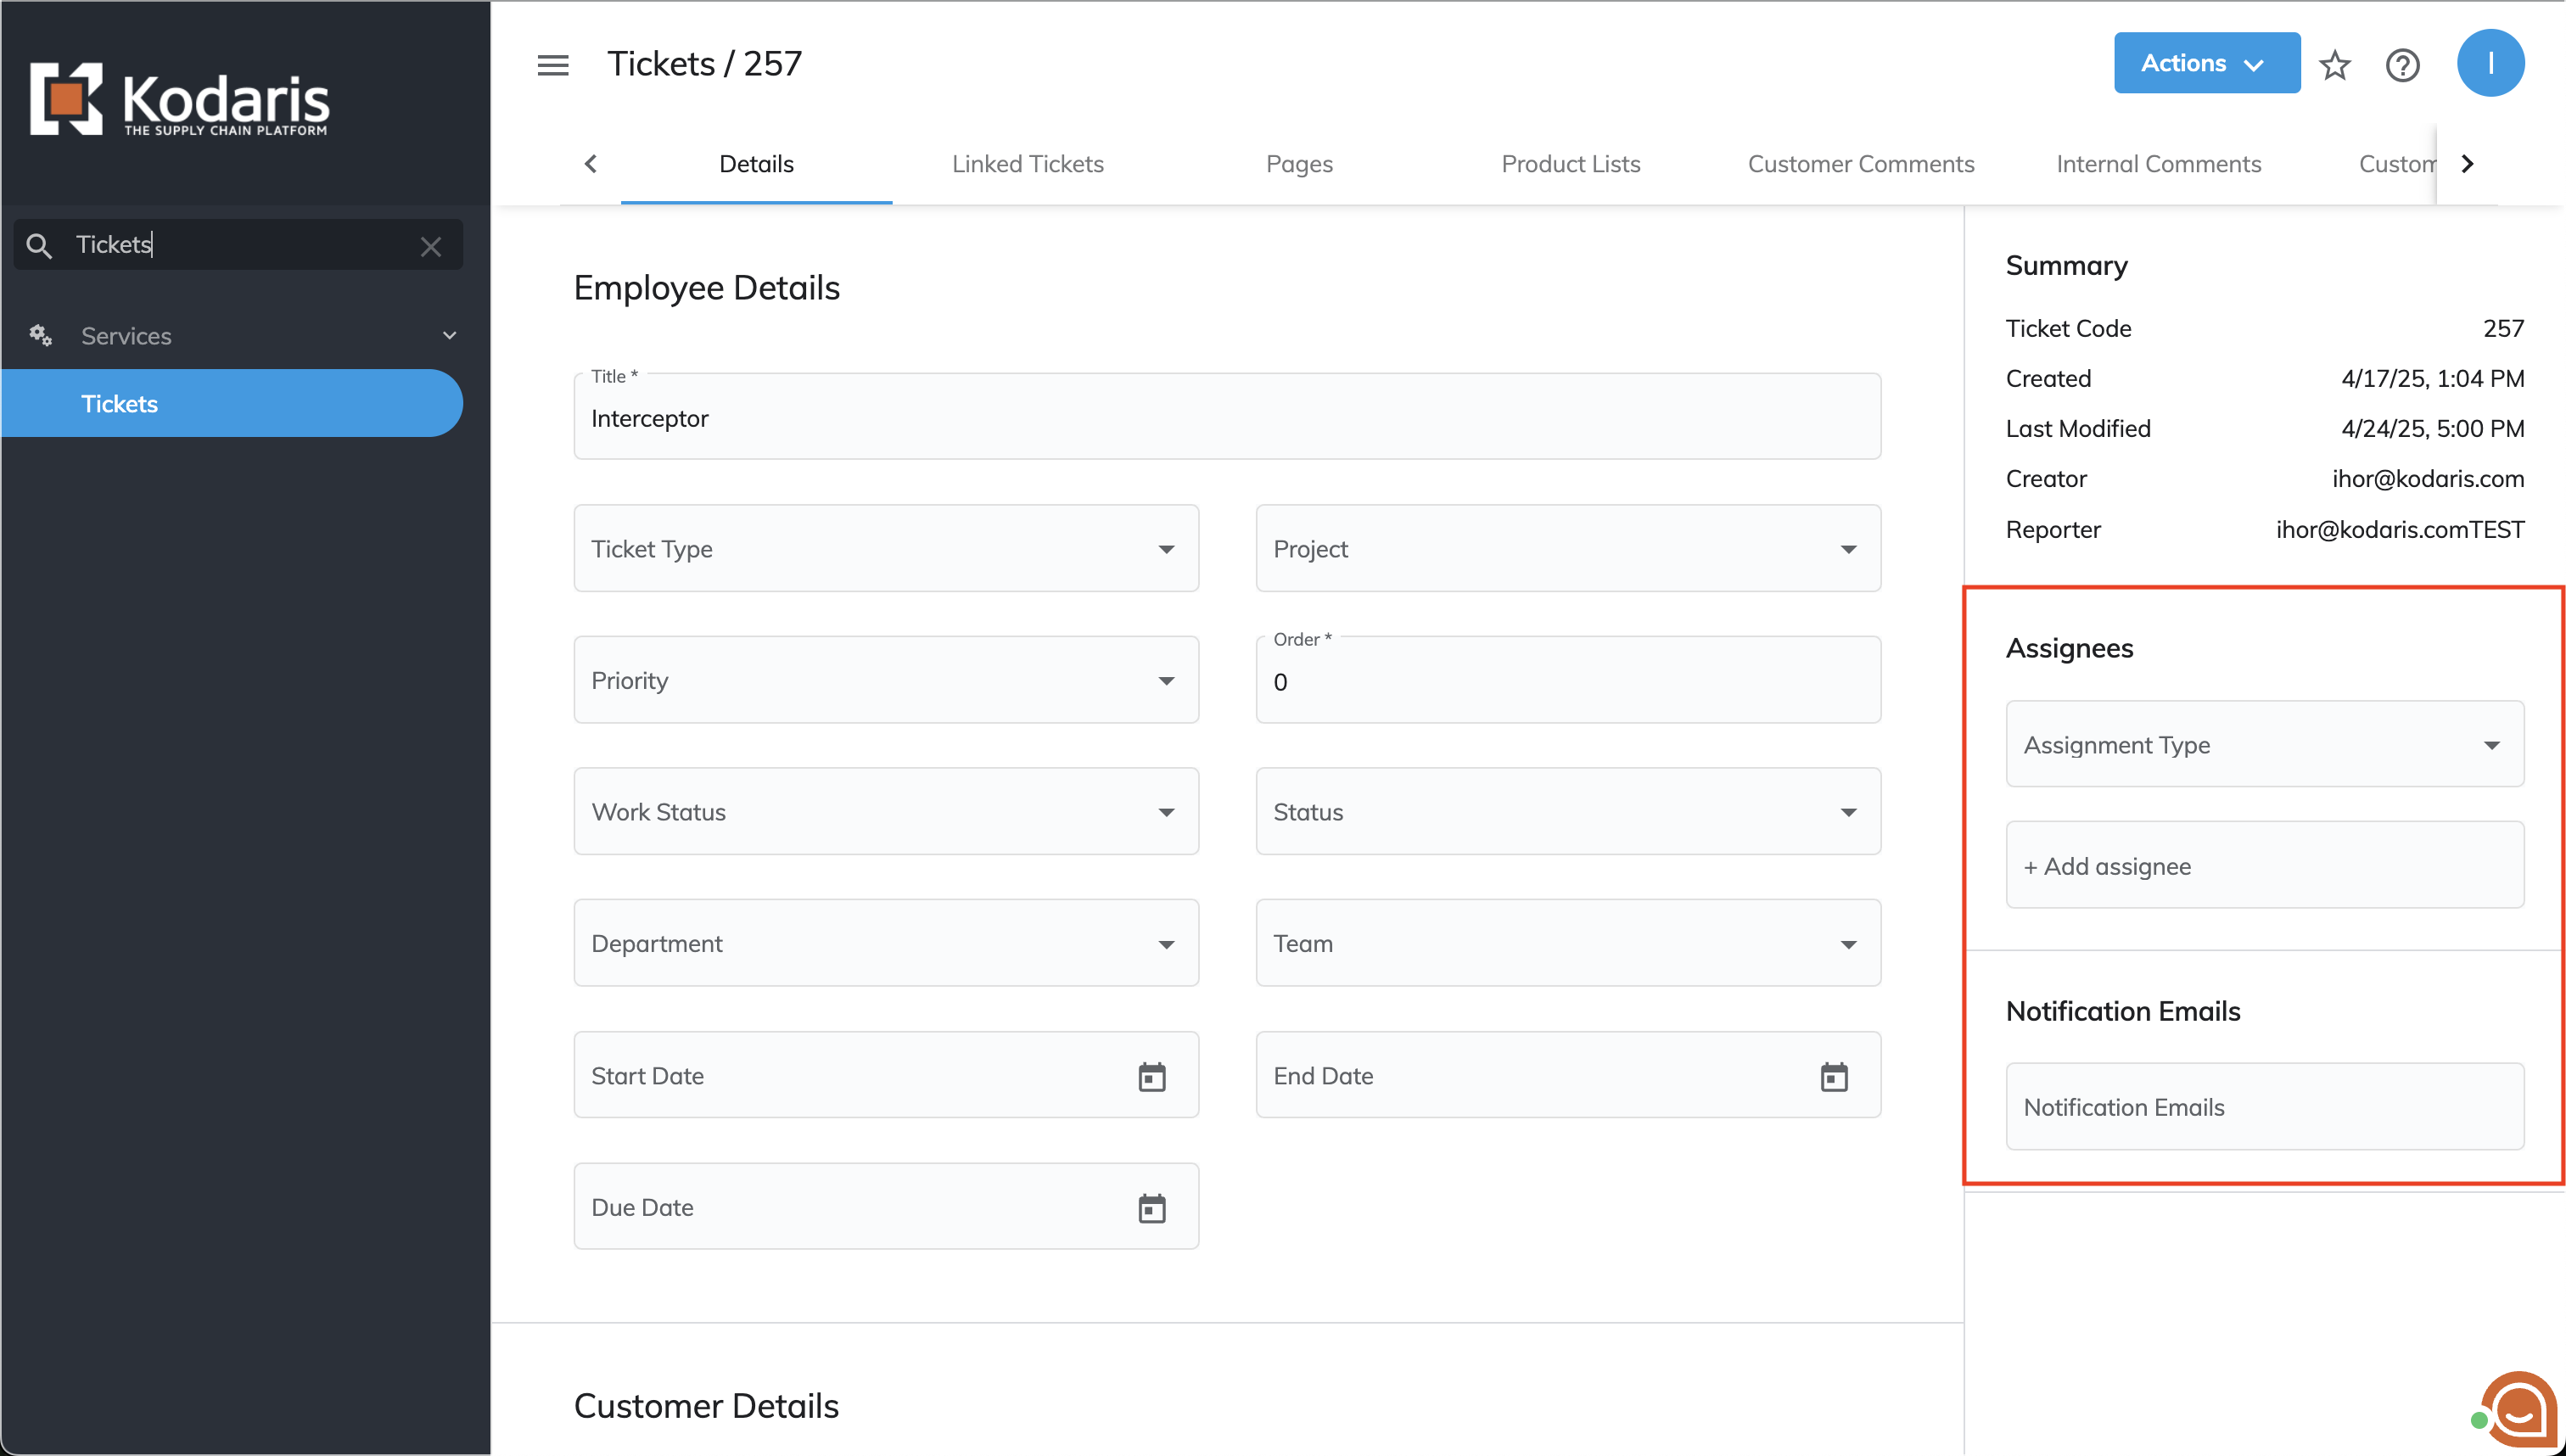
In the Operations Portal, ticketSystemPatchTicket.js is triggered on the ticket detail page when updating ticket values.

The interceptor is triggered when changes are made to either of these fields:
- Assignees
- Adding new assignees
- Removing existing assignees
- Notification emails
- Adding new notification emails
- Removing existing notification emails
On the operations portal, tickets can be accessed through the following paths:
- Opportunities
>Lead>Tickets>Ticket
- Quotes
>Quote>Tickets>Ticket
- Companies
>Company>Tickets>Ticket
- Orders
>Order>Tickets>Ticket
- Tickets
>Ticket
- Ticket Templates
>Ticket Template

Tickets can be modified from the 'Data' tab of the 'Tickets' and 'Ticket Templates' screens.

Tickets can also be modified from the 'Development' tab of the ticket page. To access this tab, the employee must have a developer role.

Roles
For execution of this ticket your employee should have one of the following roles:
- administrator
- superuser
- ticketEdit
- ticketEditAssigned
Pre-Execution
Validation
Before the interceptor is executed, the system checks an employee's access to edit a ticket. If an employee does not have any of the roles listed above, they will not be able to modify the ticket.
An additional security check occurs when an employee tries to update customer-facing ticket fields. In this case, they must also have the ticketDisplayedToCustomerEdit role assigned.
Patch
After all validations are successful, the ticket will be updated. All fields passed in the requestBody to the endpoint will be validated.
Once the ticket is updated, the interceptor will be executed.
Goal
The interceptor's code contains comments that describe all variables accessible within its scope.

Within the interceptor's scope, you can access:
- ticketID - the edited ticket's ID;
- ticket - the patched ticket object;
- ticketAPIUpdateObject - the request body;
Currently, only the updated state of the ticket is available. You can access all ticket values, including patched ones and the request body. However, you cannot compare values "before patch" and "after patch".
This means you can trigger other events related to the ticket update. You can update the same ticket using the Serverside API. Updates executed from within the interceptor will not trigger the interceptor again.
Post-Execution
After successful execution of your interceptor, no additional actions will occur. If your interceptor fails, you can view the reason and error message in the logs screen.
Example
Let's cover this example.

This code intercepts and modifies tickets that have 'test' in their title. When such a ticket is found, the code:
- Converts the title to uppercase;
- Adds the text 'Patched from interceptor' to the title;
- Updates the ticket using the ticketID stored in the interceptor's global scope".
The interceptor can be tested on the following screens:
- Ticket Detail page;
- Ticket Development tab;
- Tickets list screen.
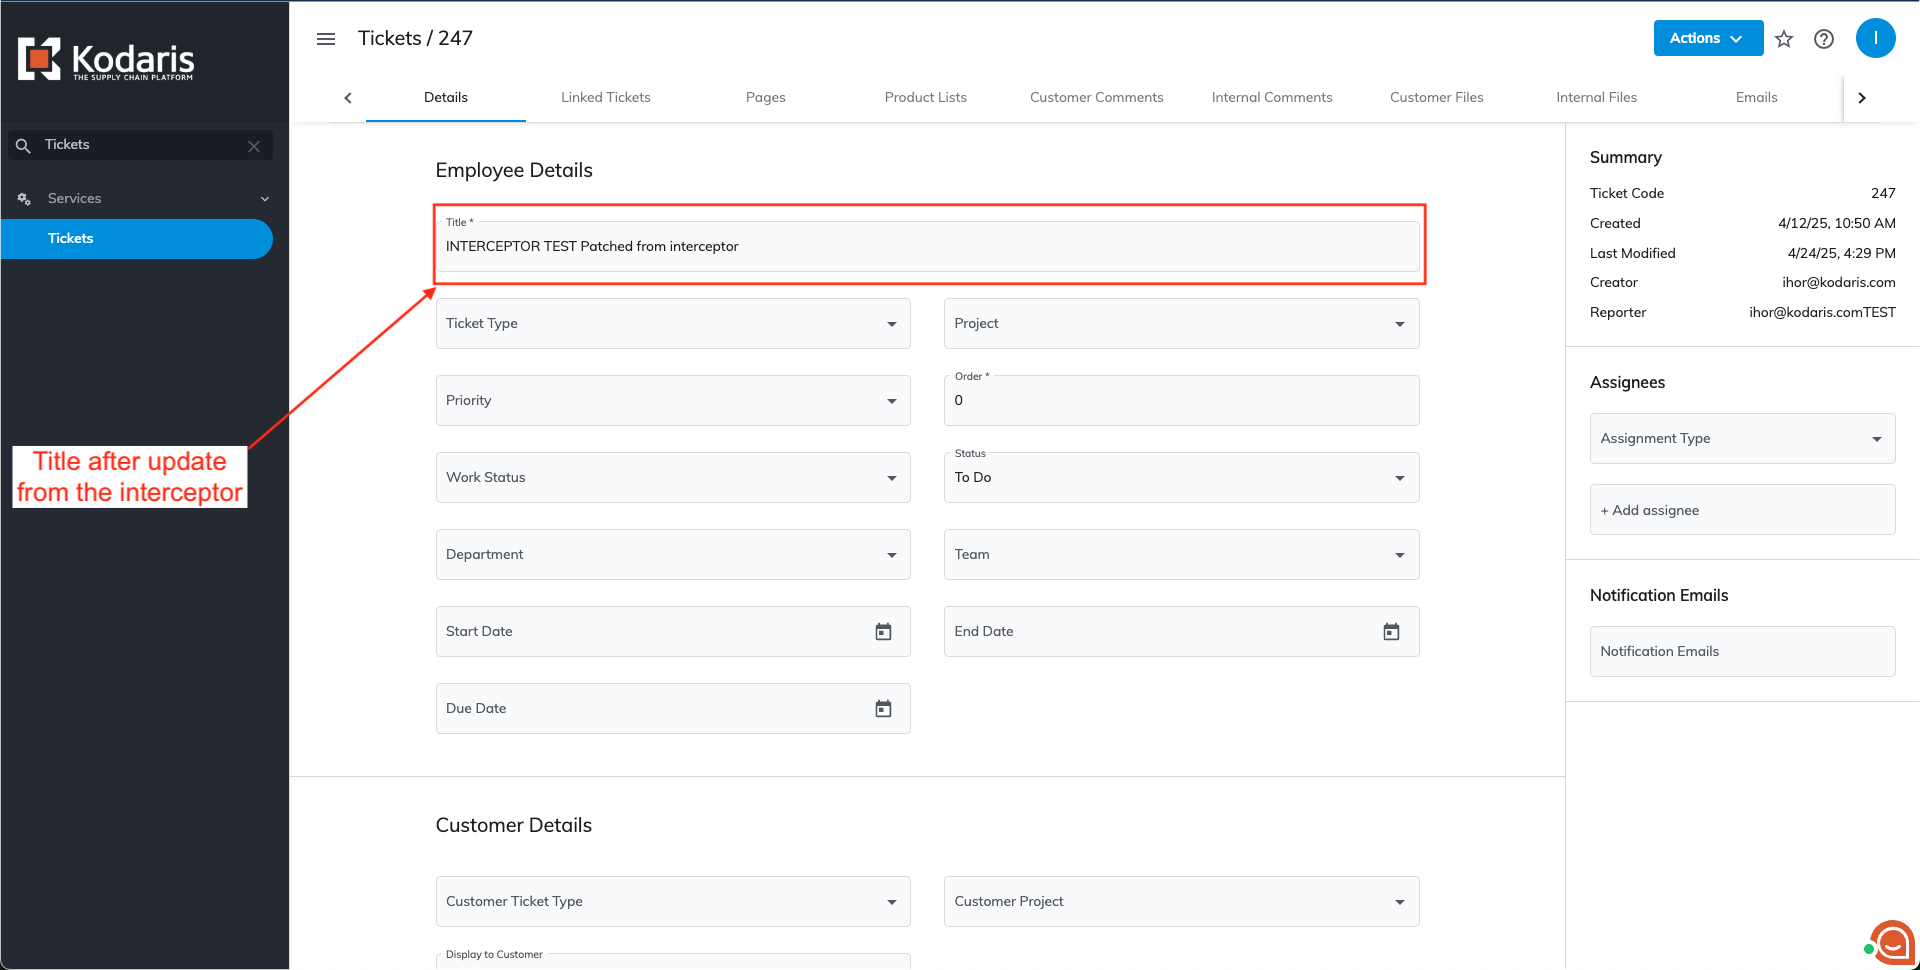
Detail page
The update can be performed through the following steps:
- Open the ticket detail page;
- Add "test" to the title field;
- Save the changes - сlick anywhere outside the title field

The interceptor changes are not immediately visible on the page. To view the applied modifications refresh the page.
Ticket Development Tab
With a developer role, employees can access the Development Ticket tab. The 'title' field is located on the left side and can be updated with 'test'.

Once you click outside the title field, changes will be applied but won't be visible on the page immediately. Reload the page to see the updated changes.

Tickets screen
The ticketSystemPatchTicket.js interceptor can be triggered from the 'Data' tab of the tickets screen.

After updating the ticket, the patch can be viewed from the interceptor immediately - no refresh needed.

The following code snippet can be used to run the same tests on the system:
var requestBody = {}

if(ticket.title && ticket.title.toString().toLowerCase().indexOf('test') > -1 ) {
  requestBody.title = ticket.title.toString().toUpperCase() + ' Patched from interceptor'
}

var ticketPatch = kd.api.fetch({
  method: 'PATCH',
  endpoint: '/api/system/ticket/{ticketID}',
  pathParams: {
    ticketID: ticketID
  },
  queryParams: {
    version: 2
  },
  body: requestBody
});
ticketSystemPostNote.js
Execution
Swagger
The ticketSystemPostNote.js interceptor is triggered when the /api/system/ticket/{ticketID}/note/ endpoint is called on the Kodaris API.

Operations portal
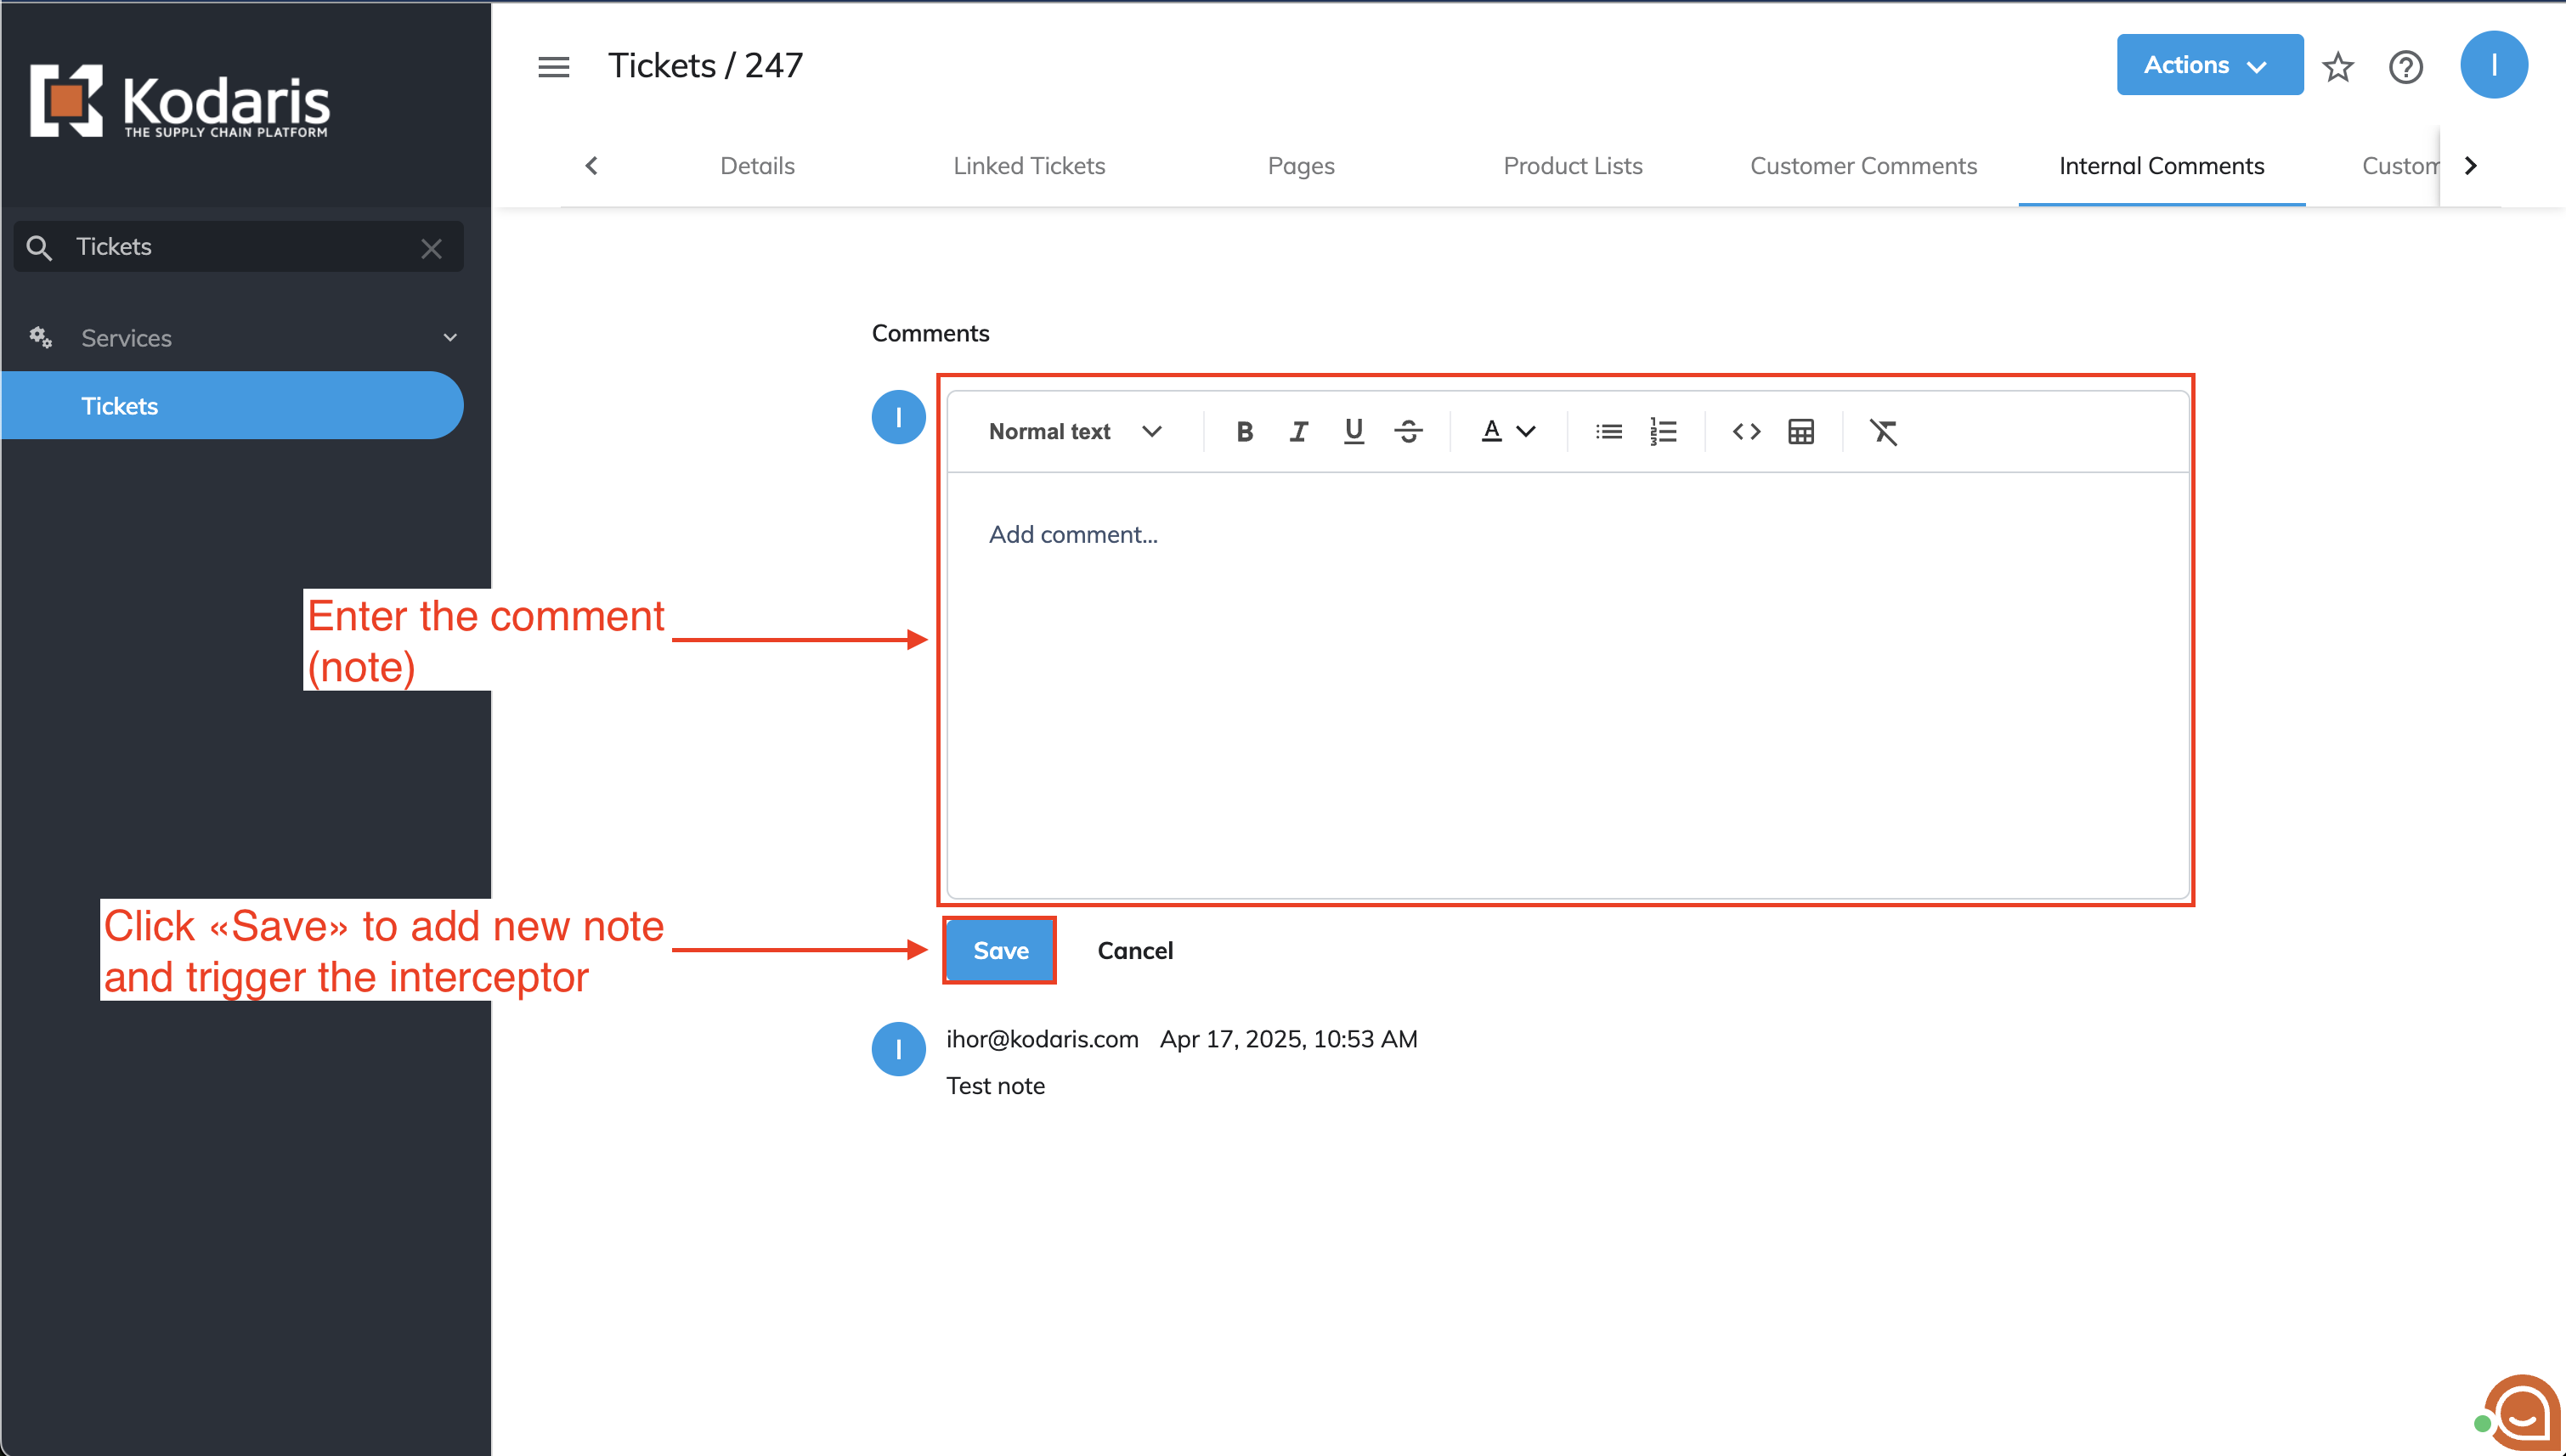
The ticketSystemPostNote.js handles new internal notes (commends) when they are added to tickets in the Operations portal.
Tickets Search and Data Tabs
A comment icon is available on the Search tab in the Tickets screen
Clicking the comment icon opens a panel on the right side where notes can be added. Once a note is written and 'Save' is clicked, the interceptor is executed.

Notes can also be added and managed using the Data tab.
The note-adding process in the Data tab works the same way: a comment panel appears on the right side where notes can be added and saved.

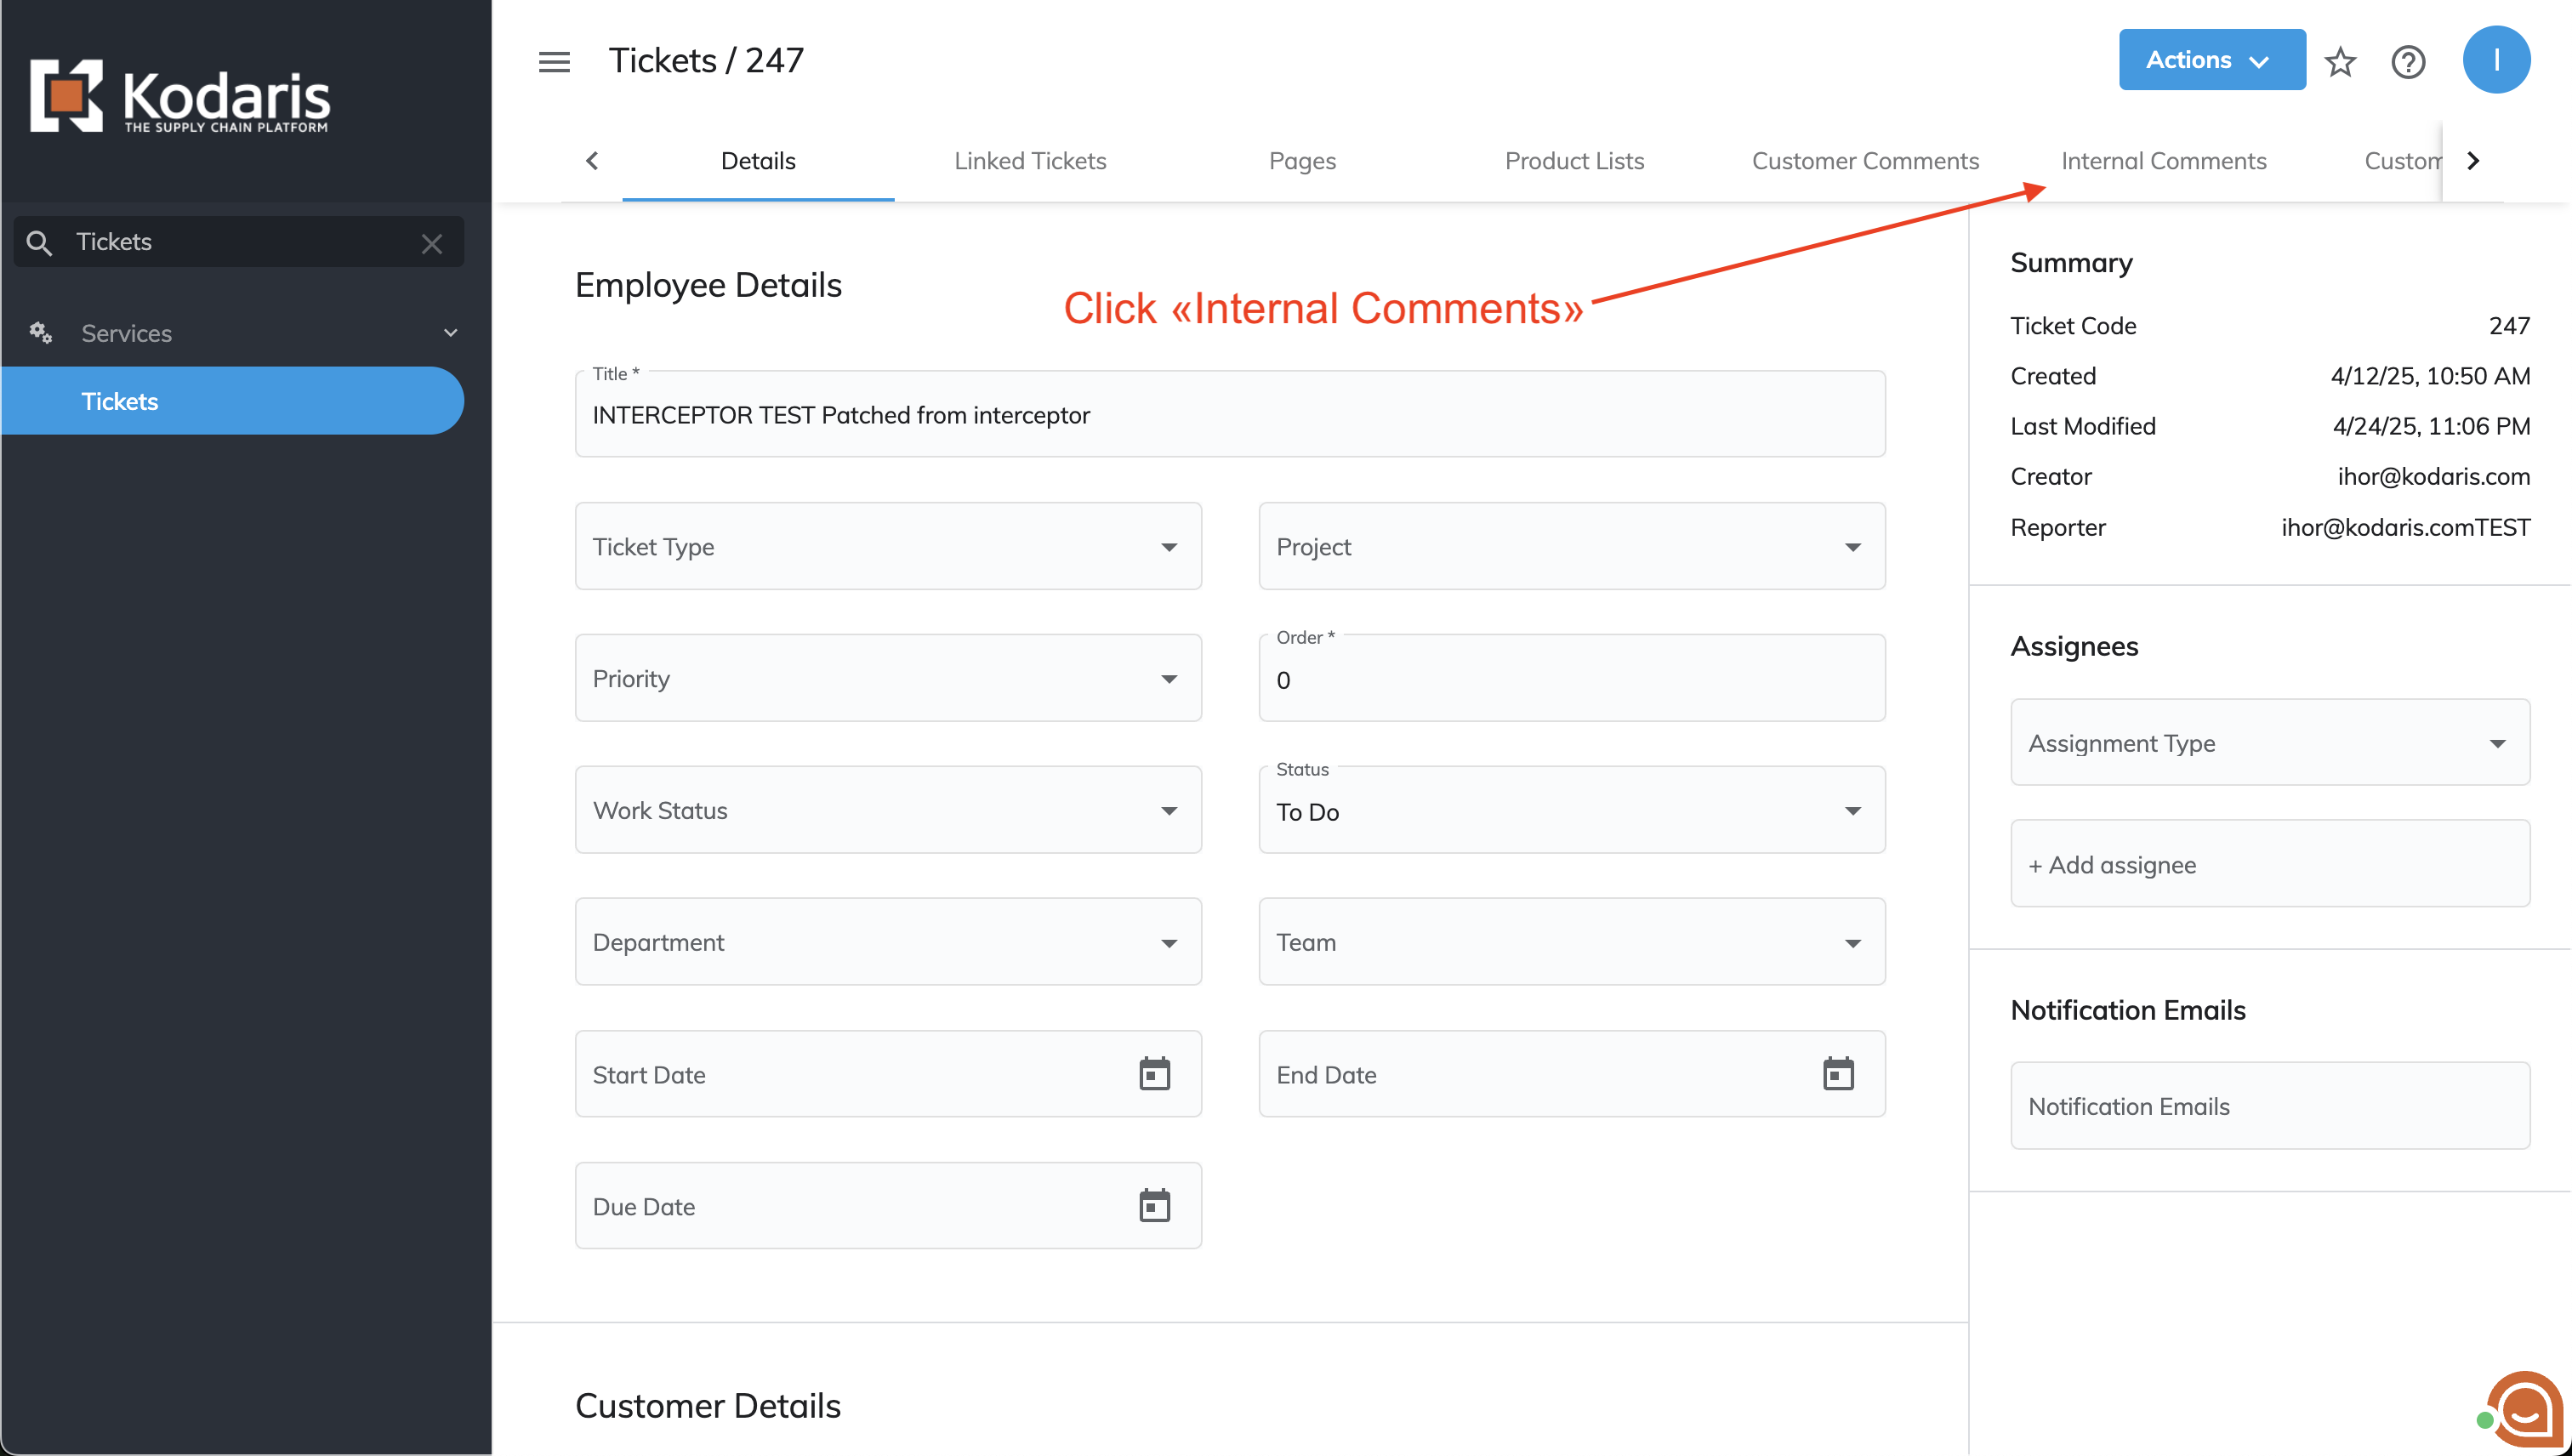
Ticket Detail Page
The ticketSystemPostNote.js can also be accessed through the ticket detail page in the Operations Portal.
On the ticket detail page, comments are filtered by the 'Display to Customer' setting:
- When set to 'No': internal comments are shown
- When set to 'Yes': customer-facing comments are displayed

Adding and saving a comment in the Internal comment section activates the note-handling process (triggers the interceptor).

Ticket's Internal Files
The Internal Comments section within the Ticket screen is another location where note-handling can be accessed.
The process remains consistent: entering and saving a comment to the ticket initiates the note-handling procedure (executes the interceptor).
Roles
Adding notes requires one of these access roles:
- administrator
- superuser
- ticketEdit
- ticketEditAssigned
Pre-Execution
A permission check is performed to ensure the employee has the necessary access rights before processing the comment
Once employee permissions are confirmed, the system proceeds with saving the note to the ticket.
The ticketSystemPostNote.js interceptor is executed after the internal comment is successfully added to the ticket.
Goal
The default interceptor code consists of comments explaining the available global scope variables.
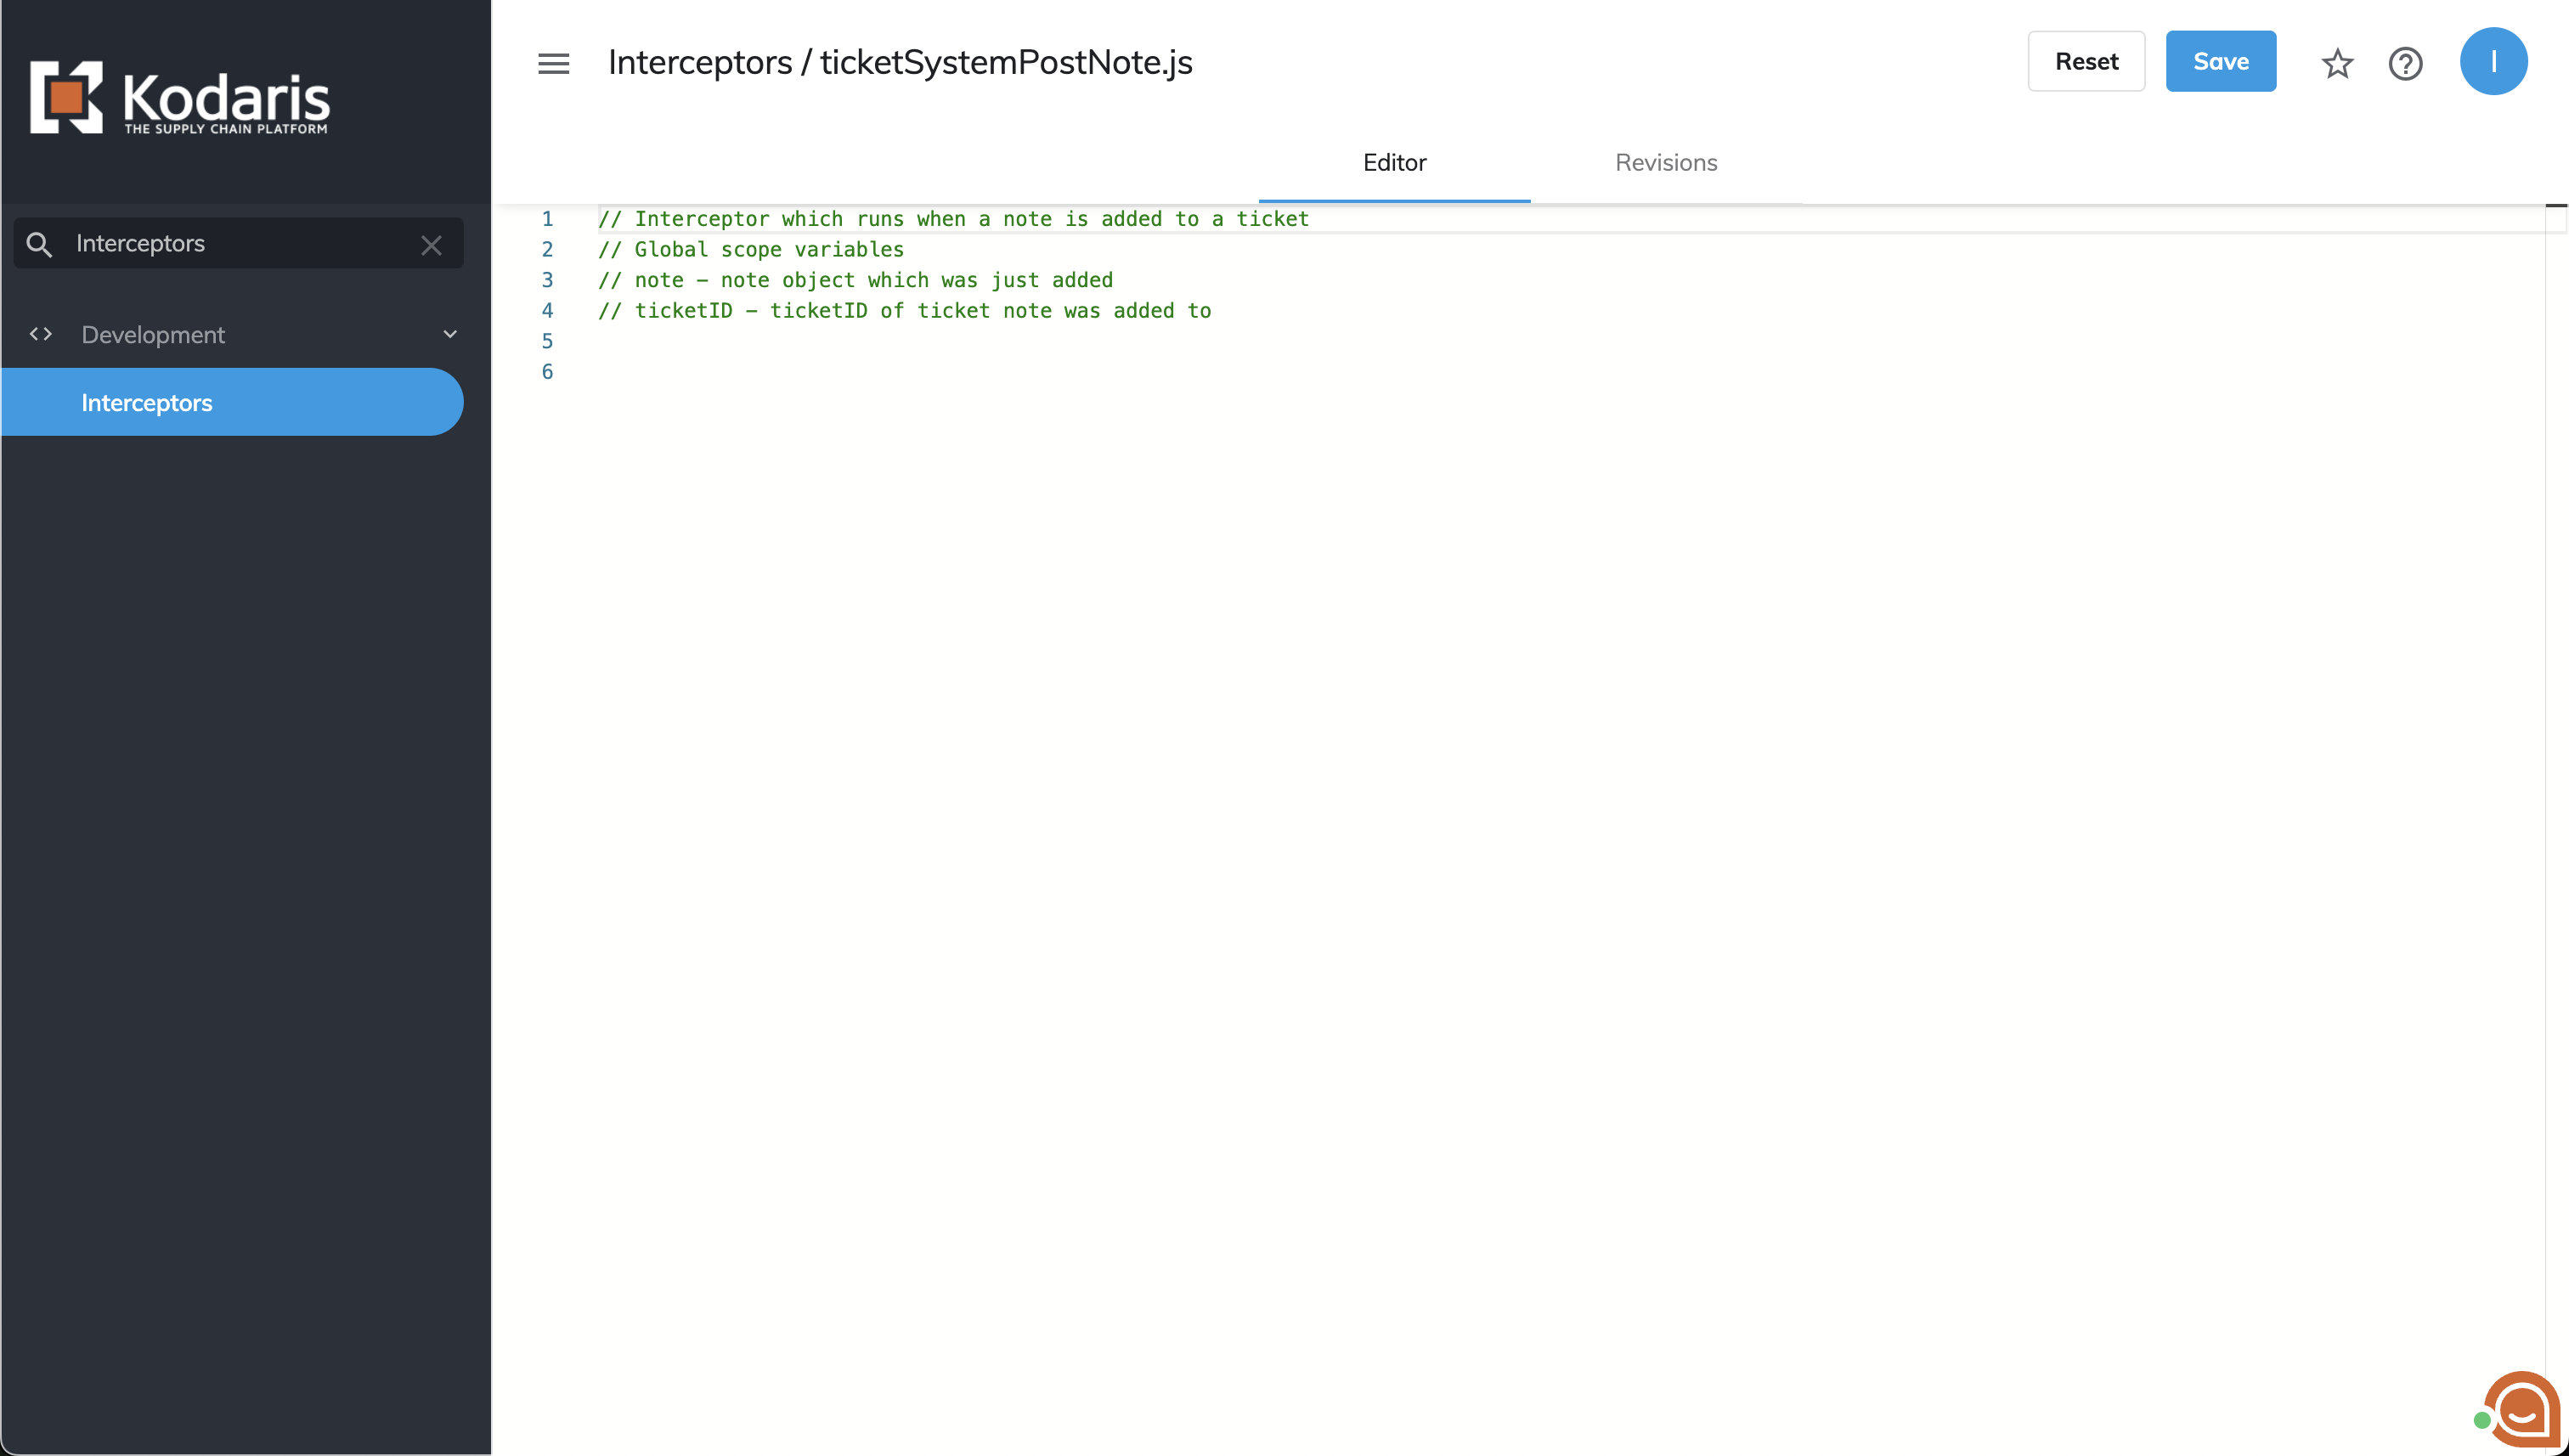
Within this interceptor's scope, the following variables are accessible:
- ticketID - the ID of the ticket where the note was added;
- note - the newly added note object.
Post-Execution
The interceptor returns the note from the endpoint after execution. However, any modifications made to the note object within this interceptor will not affect the actual stored comment.
Example
Here's an example of the ticketSystemPostNote.js interceptor:
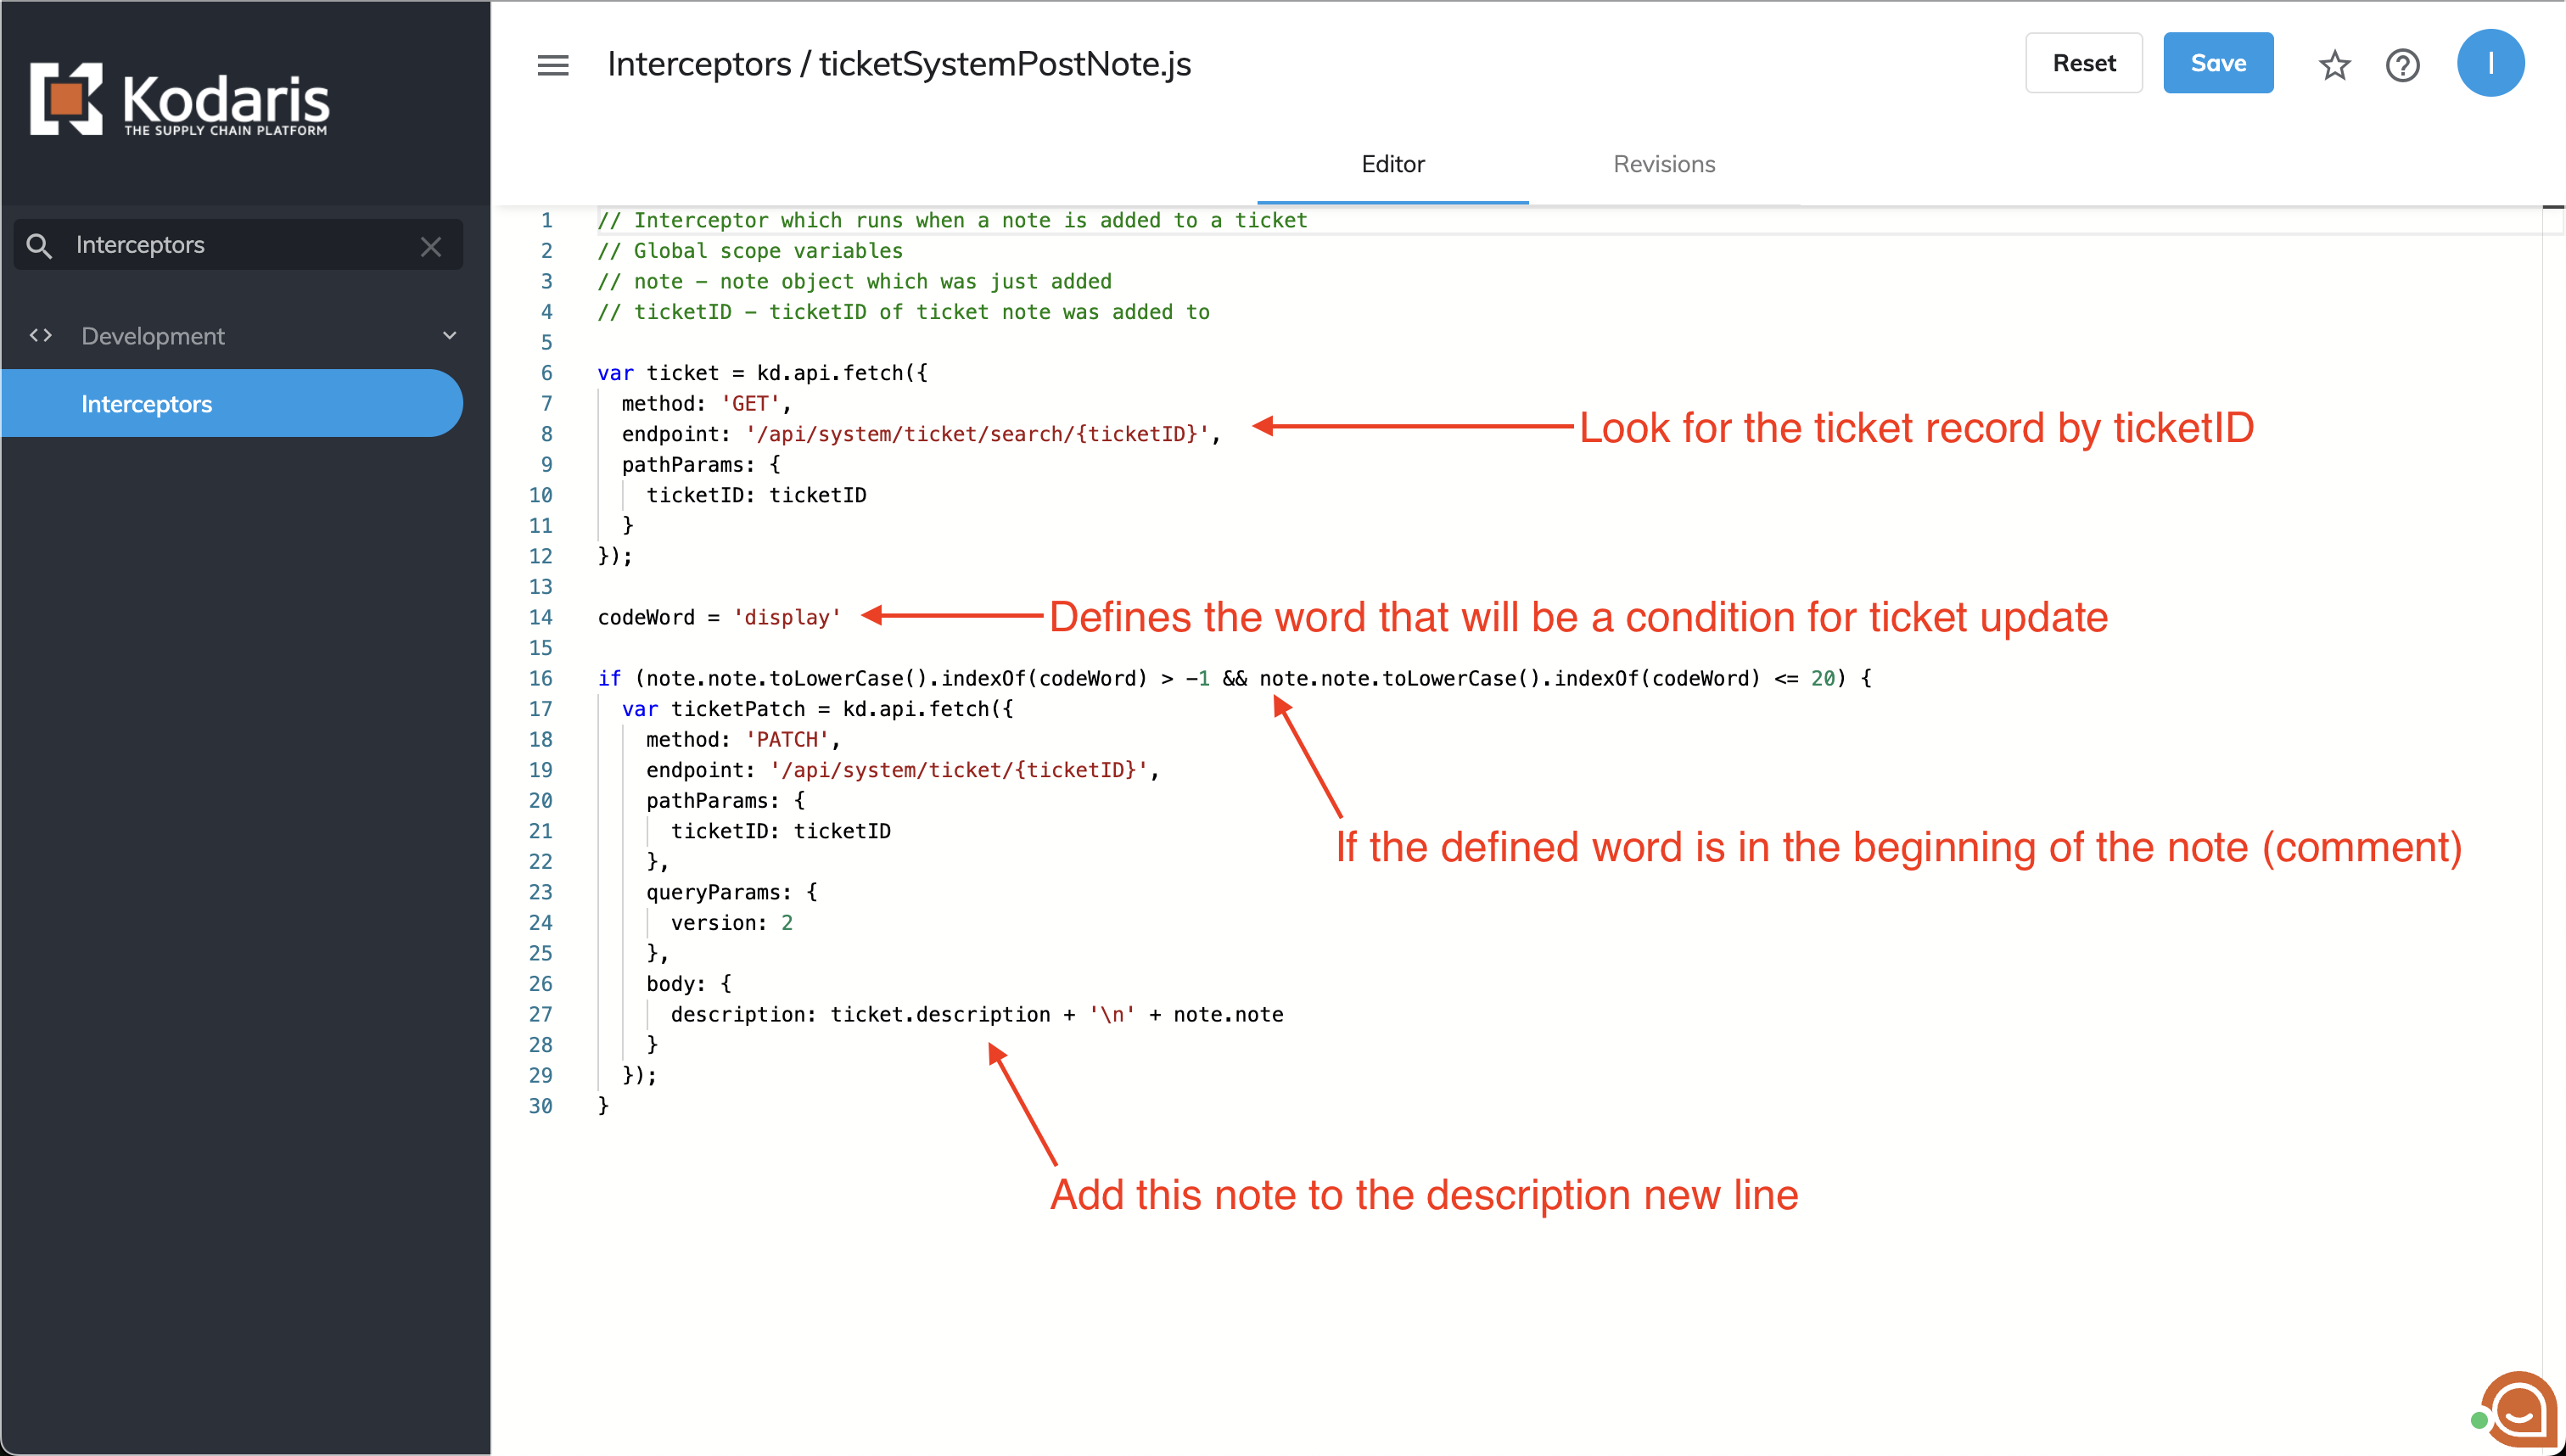
This code retrieves a ticket record based on the ticketID.
Next step: Specify a keyword to control note addition to the ticket's description.
Example code checks if the note begins with the specified keyword. If found, appends the note's content to the ticket's description.
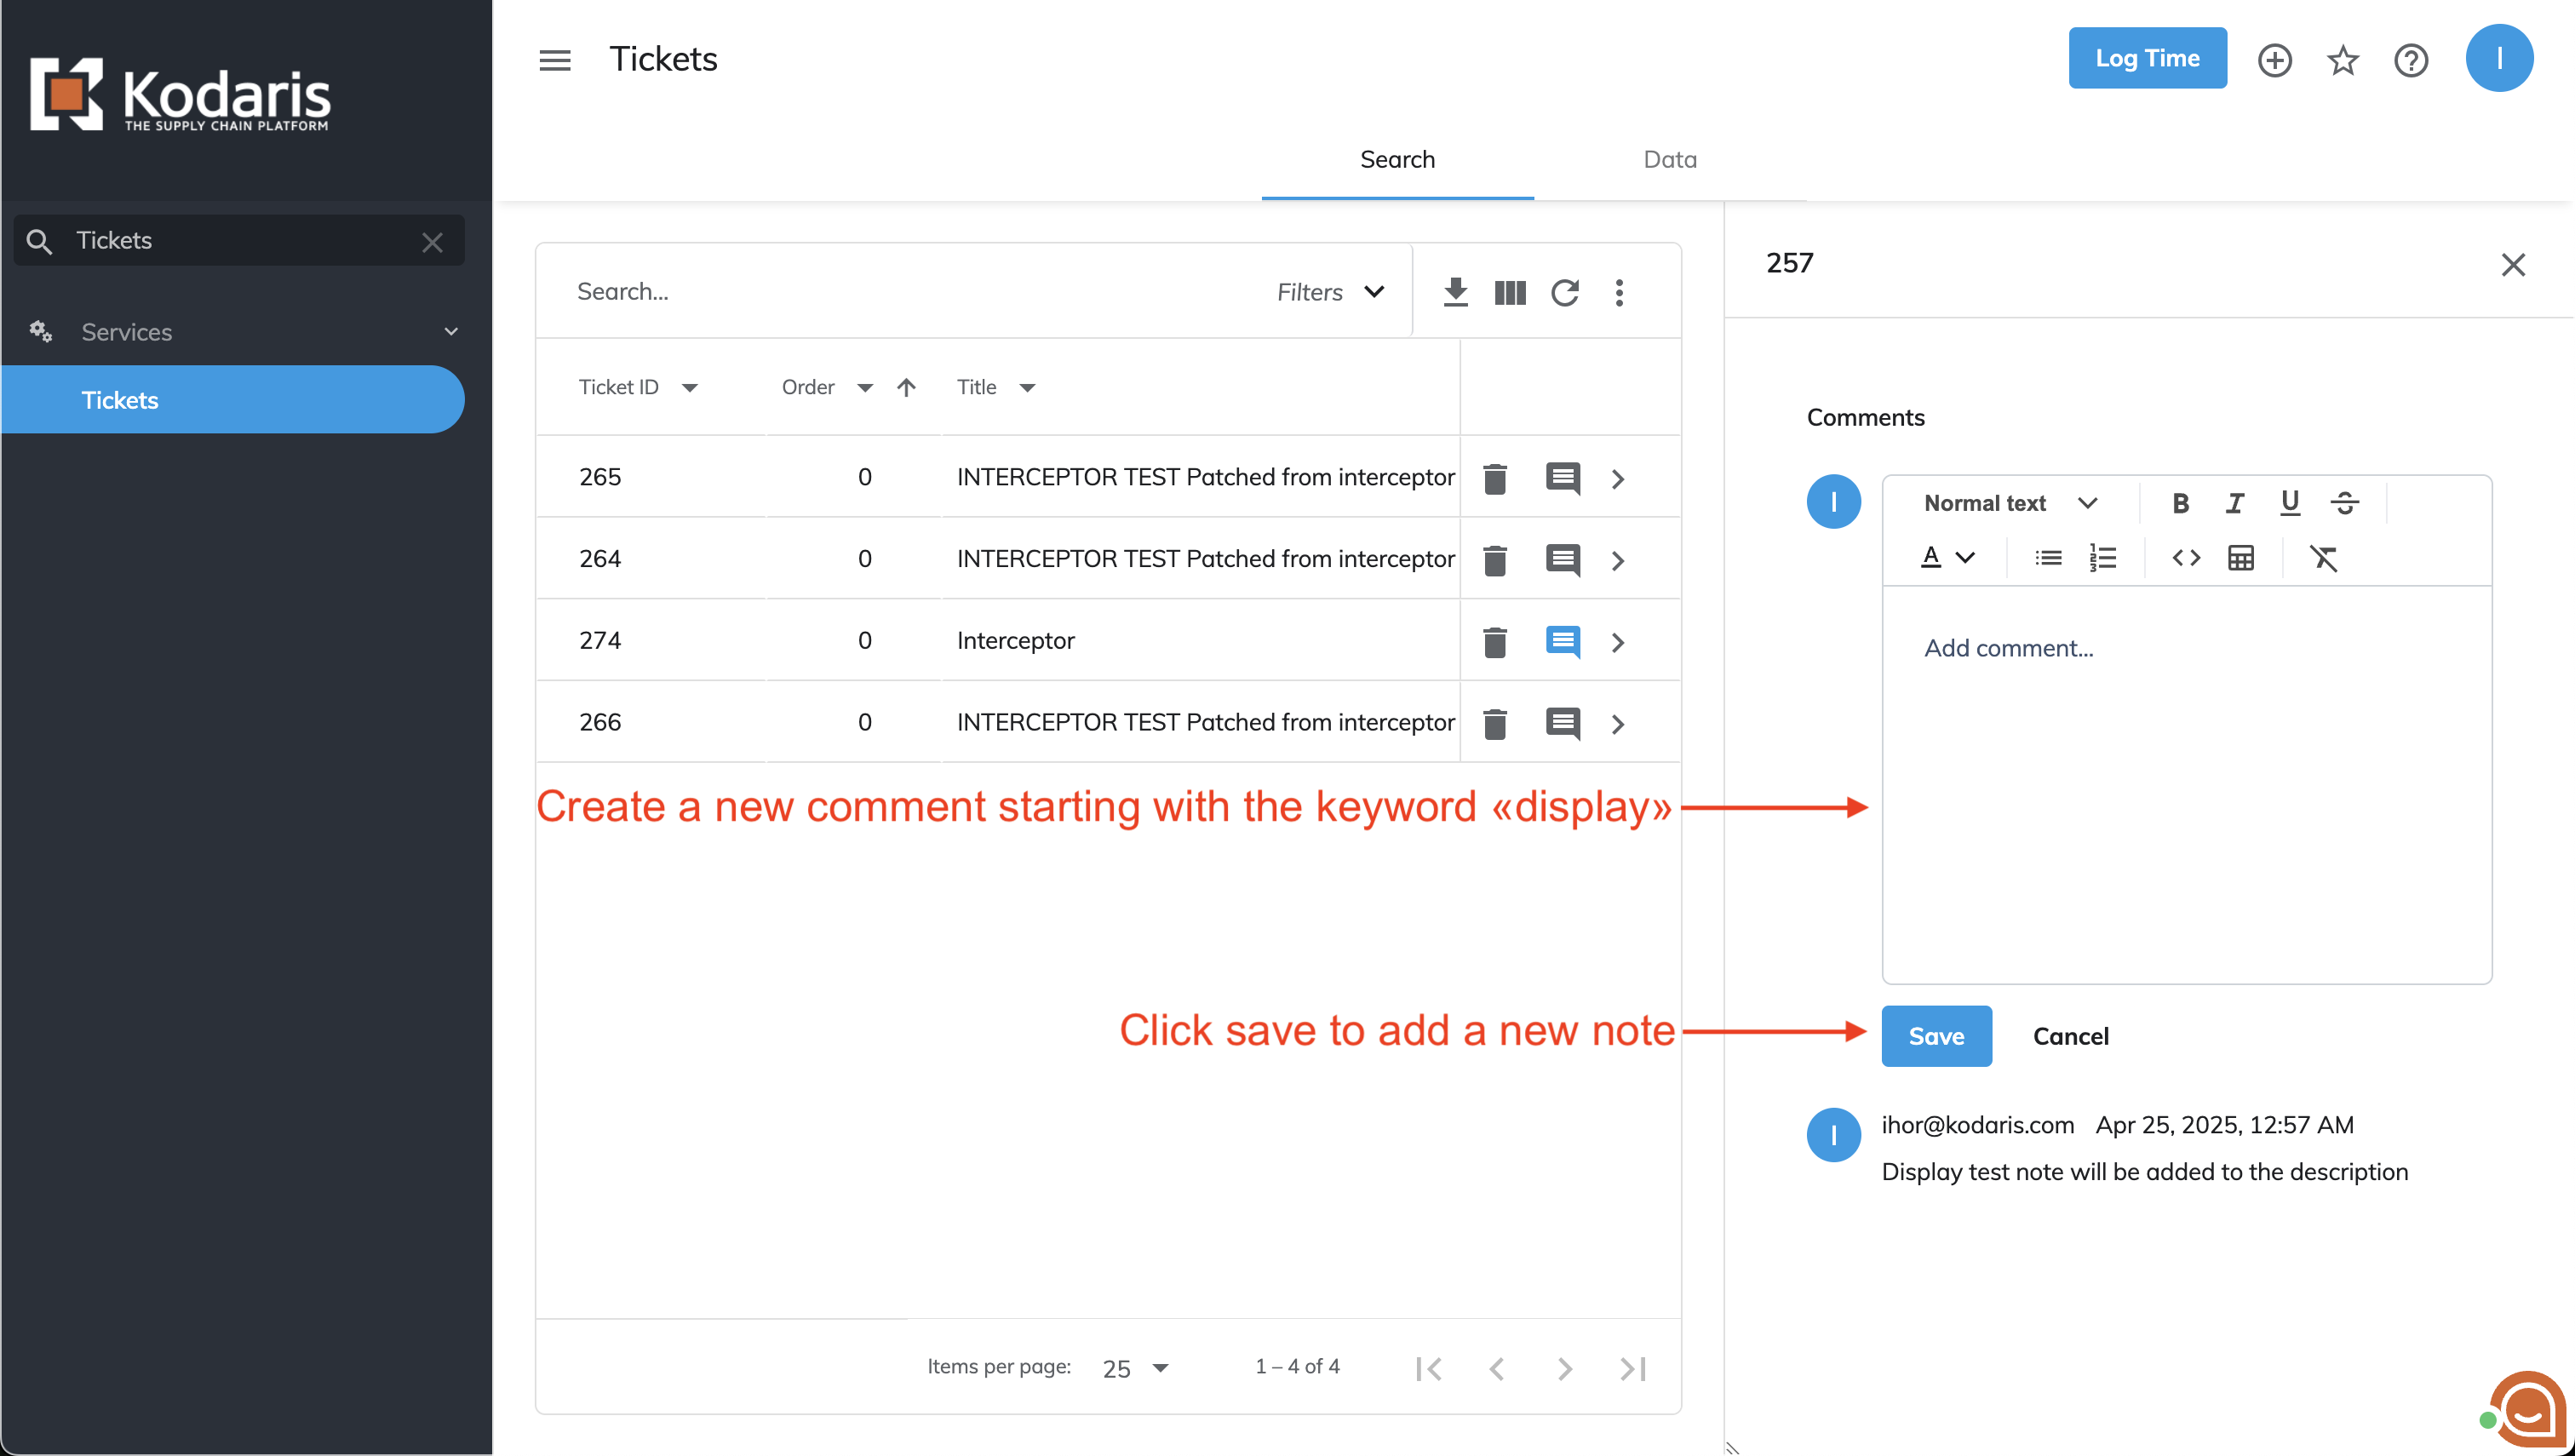
To test this interceptor, access any ticket screen where note-adding is supported.

Add a new comment beginning with 'display' and click 'Save' to activate the interceptor.
After adding the note, refresh the page if you are on the ticket detail screen or ticket internal comments tab.
When on the tickets screen, navigate to the specific ticket where you added the new note.
Verify the interceptor's execution by checking the ticket's description field.

The following code snippet can be used to run the same tests on the system:
var ticket = kd.api.fetch({
  method: 'GET',
  endpoint: '/api/system/ticket/search/{ticketID}',
  pathParams: {
    ticketID: ticketID
  }
});

codeWord = 'display'

if (note.note.toLowerCase().indexOf(codeWord) > -1 && note.note.toLowerCase().indexOf(codeWord) <= 20) {
  var ticketPatch = kd.api.fetch({
    method: 'PATCH',
    endpoint: '/api/system/ticket/{ticketID}',
    pathParams: {
      ticketID: ticketID
    },
    queryParams: {
      version: 2
    },
    body: {
      description: ticket.description + '\n' + note.note
    }
  });
}
ticketSystemPostTicket.js
Execution
Swagger
The ticketSystemPostTicket.js interceptor is triggered when the /api/system/ticket endpoint is called on the Kodaris API. This endpoint accepts a request body containing ticket record fields, where empty, missing, or not provided fields will be ignored during ticket creation.

Operations portal
On the Operations Portal, this interceptor can be triggered from screens that allow ticket creation.
Tickets
In the Tickets screen, a new ticket can be added by clicking the '+' button, which is available under both the Search and Data tabs.

Upon clicking the '+' button, a dialog window appears for initial ticket configuration.

The dialog window requires a Ticket title input, while company selection and template application remain optional.
After the ticket configuration is complete and the 'Add' button is clicked, the ticket will be created and the interceptor will be triggered.
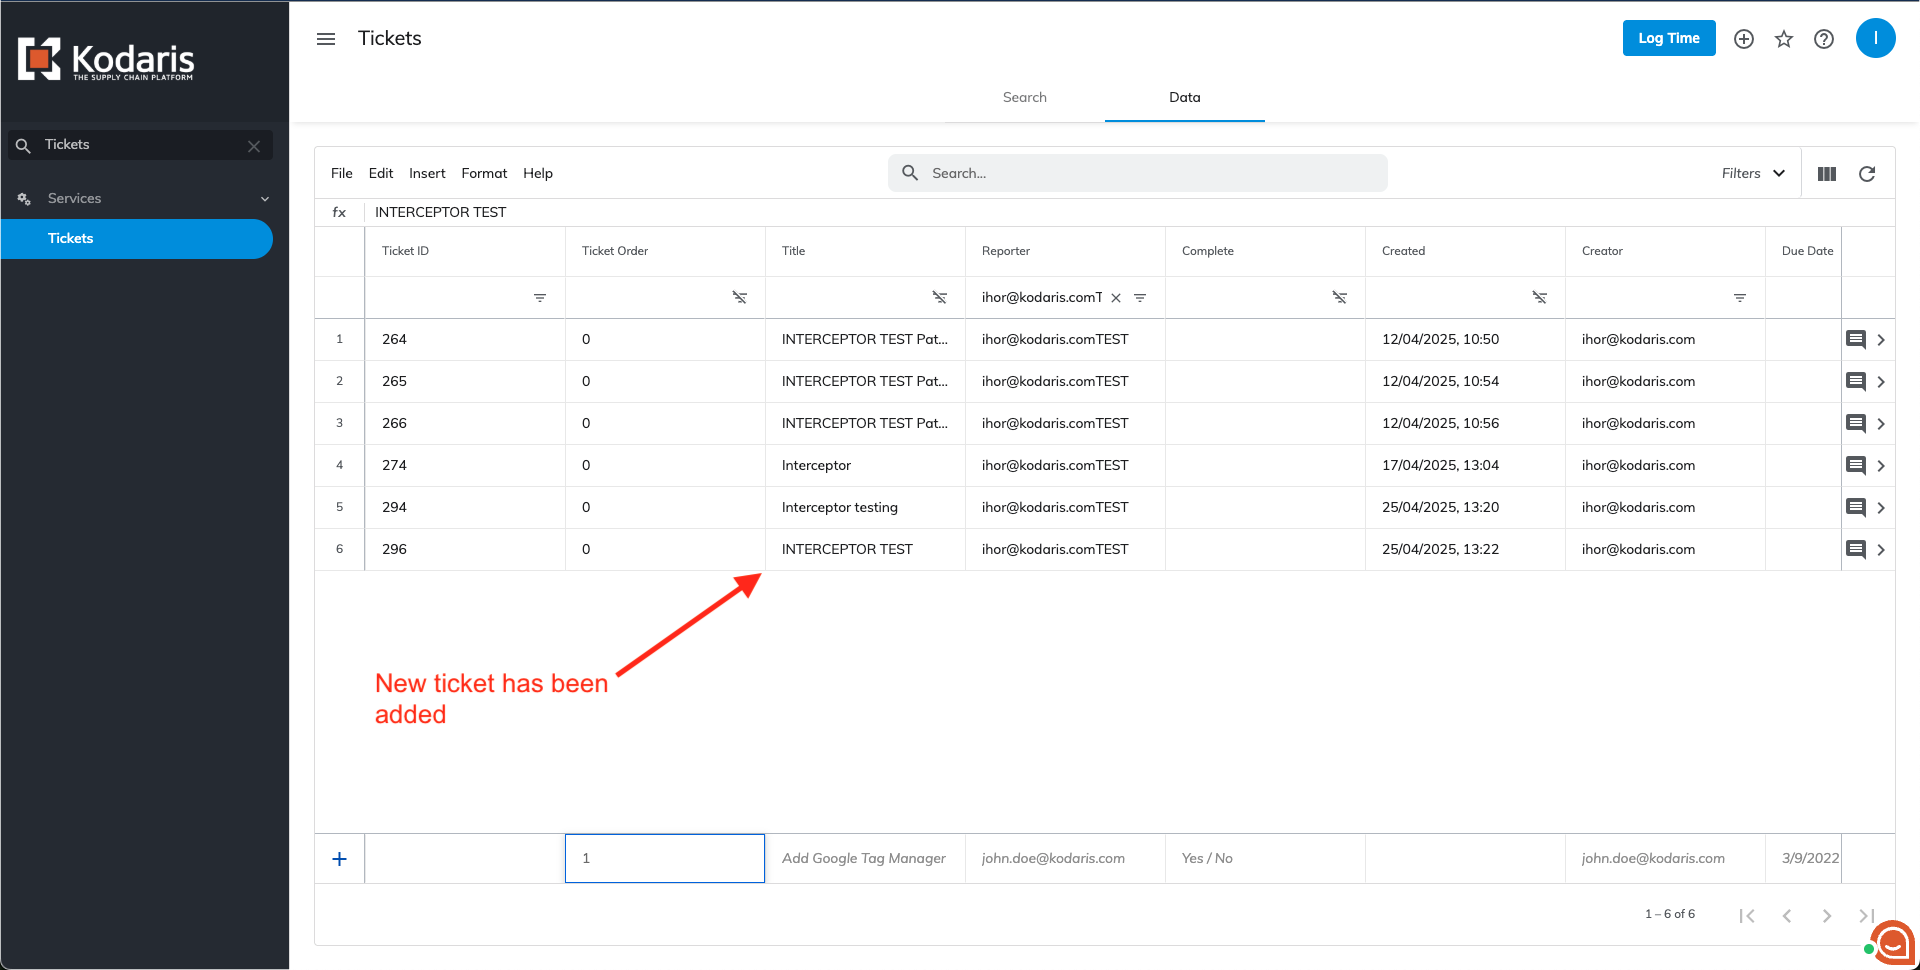
The same process applies to the Data tab. Additionally, a new ticket can be created directly from the Data grid by entering values into the selected columns and pressing 'Enter'.

You will see that the ticket has been added to the system from the same grid
Activities
Activities are tickets that have their 'ticketType' value set to 'Activity'. This configuration triggers the ticketSystemPostTicket.js interceptor
Activities can be added from two screens: Home and Activity. On the Home screen, activities are created by navigating to the 'Activities' tab and clicking the '+' button.

On the Activities screen, a similar '+' button is available for activity creation.

When the '+' button is clicked, a dialog window appears. The dialog requires both Title and Company fields to be filled, while the Template field remains optional.

Clicking the 'Start' button redirects to the newly created activity page.

The newly created activity may not appear immediately on the Activities screen or tab, as the Kodaris System requires time to process and display it in the table. The control can be refreshed after a brief moment to confirm the activity has been successfully created.

Templates
The template field, available in both ticket and activity creation dialogs, draws its values from configurations set in the Ticket Template and Activity Template screens respectively.
Both ticket and activity templates are implemented as tickets with specific ticketType values. Ticket templates use 'TicketTemplate' as their ticketType, while activity templates use 'ActivityTemplate'.
New ticket templates can be created on the Ticket Templates screen by clicking the '+' button located under the Service tab.

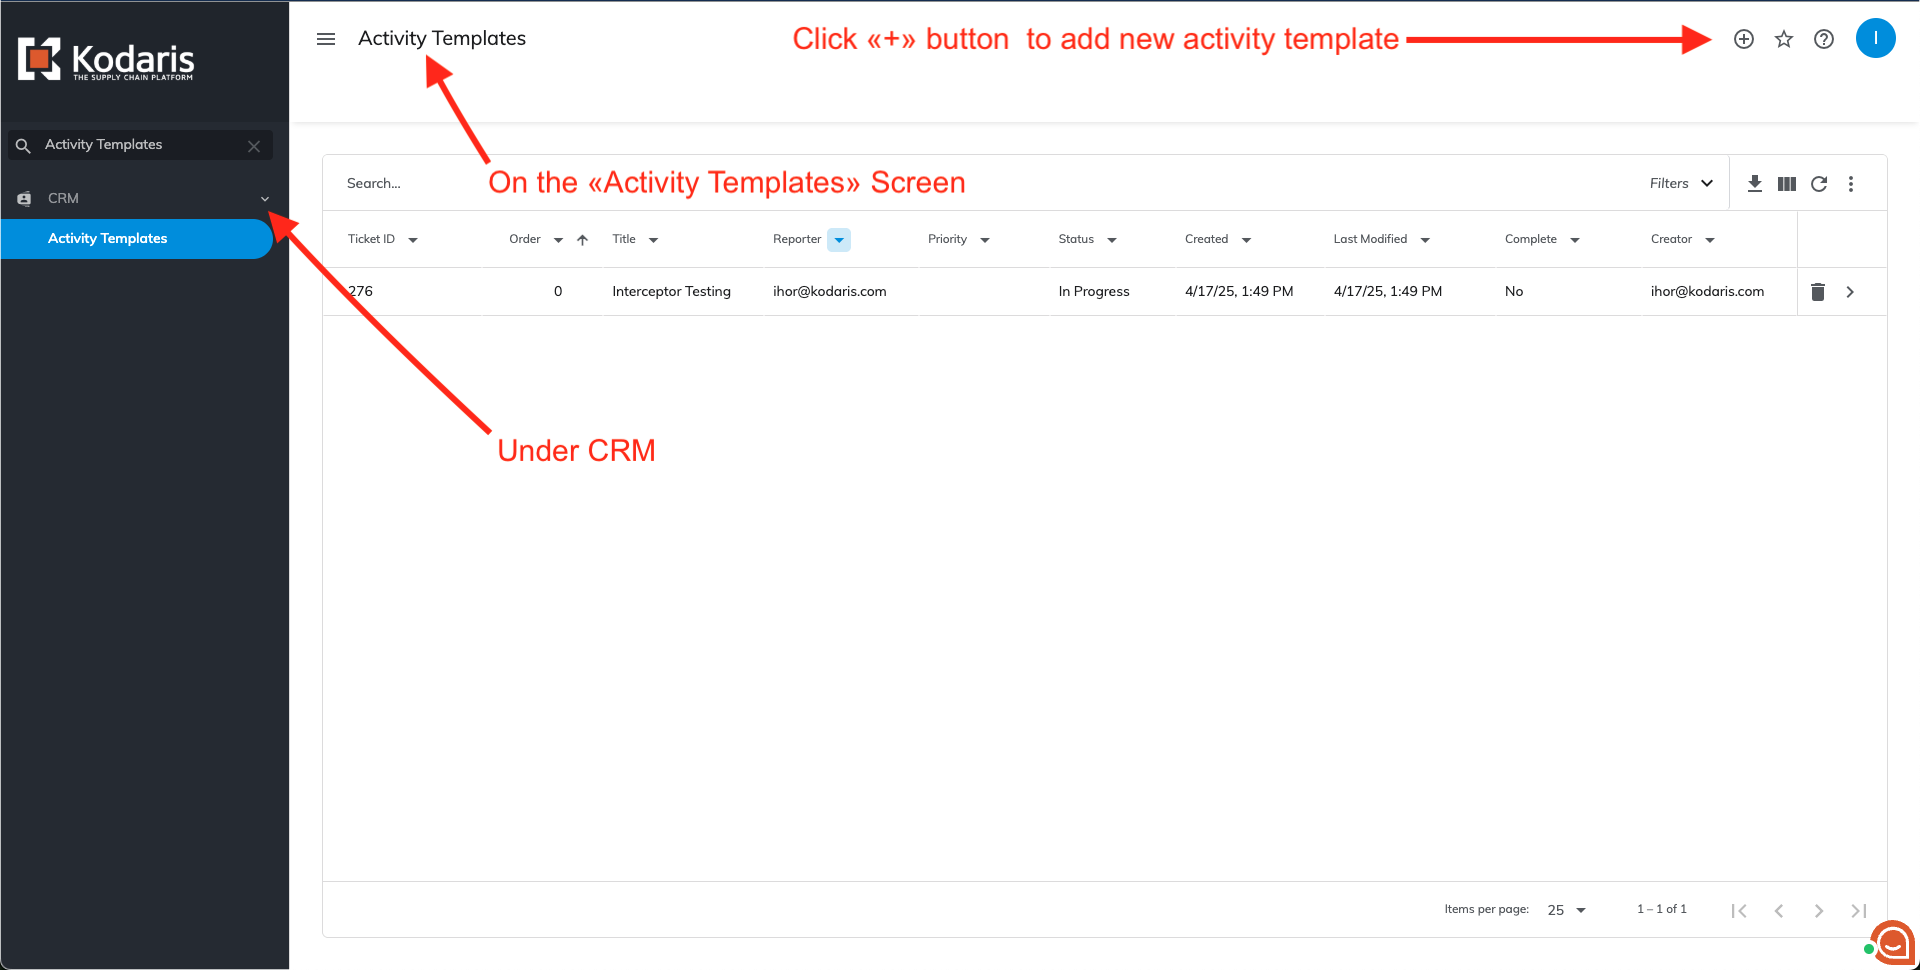
New activity templates can be created on the Activity Templates screen by clicking the '+' button located under the CRM tab.
Clicking the '+' button opens a creation dialog for either ticket or activity templates. In both cases, only the 'Title' field is required.

After clicking the 'Add' button, the template is created and the page redirects to the template's detail view. This view appears as a regular ticket (or activity) detail page, where default values can be configured. These values will be automatically applied when creating new tickets (or activities) using this template.
The following guide describes the proper process for configuring templates within the Kodaris System.
- Creating a Template;

- Set the values that will be automatically applied when a new ticket is created using this template;

- Using Templates During Creation;

- Confirm that all template values have been correctly applied to the new ticket.

Log time
Time records can be created either from the Tickets screen or the ticket's detail page. These records are technically tickets with ticketType 'Worklog' and status 'Entered', which triggers the interceptor upon creation.
Clicking the 'Log Time' button on the Tickets screen opens a time logging dialog.

The dialog requires entering the Ticket, Date, and Description. For time input, either Hours or Minutes must be provided - once one of these fields is filled, the other becomes optional. For example, if you set Hours, the Minutes field is no longer required, and vice versa. An optional Employee field is available for logging time on behalf of other team members.

The same time logging dialog can be accessed from the ticket's detail page by clicking 'Actions' > 'Log Time'.

This dialog contains the same fields as the one accessed from the Tickets screen, except the Ticket field is not displayed since it's automatically populated from the current ticket's context.

When the 'Log' button is clicked, the system creates a new ticket configured as a worklog (ticketType = 'Worklog' and status = 'Entered'), which triggers the interceptor.

Roles
Creating tickets from the employee portal requires one of these roles:
- administrator
- superuser
- ticketEdit
Pre-Execution
Before triggering the interceptor, the system first verifies if the employee has basic permissions to create tickets. Then, if the ticket is marked as customer-facing (by setting 'Display to Customer' to 'Yes'), the system performs an additional check to ensure the employee has the ticketDisplayedToCustomerEdit role.
Once all security checks are passed, the system performs automatic field population. If not already specified, the Creator, Reporter, and CreatedBy fields are automatically set to the current employee's information.
The ticket is then added to the Kodaris system. If the ticket is customer-facing, the system will automatically send notifications to any customers who have configured their notification preferences to receive updates.

Finally, after successful ticket creation, the interceptor is executed.
Goal
This interceptor's primary purpose is to perform post-processing operations on newly created tickets through server-side API functionality.

The interceptor provides access to two key objects:
- ticket - the ticket object representing the newly created ticket
- ticketAPIUpdateObject - the object containing the incoming data used during ticket creation
Post-Execution
The ticket object is returned in its original state, without any modifications from the interceptor.
Example
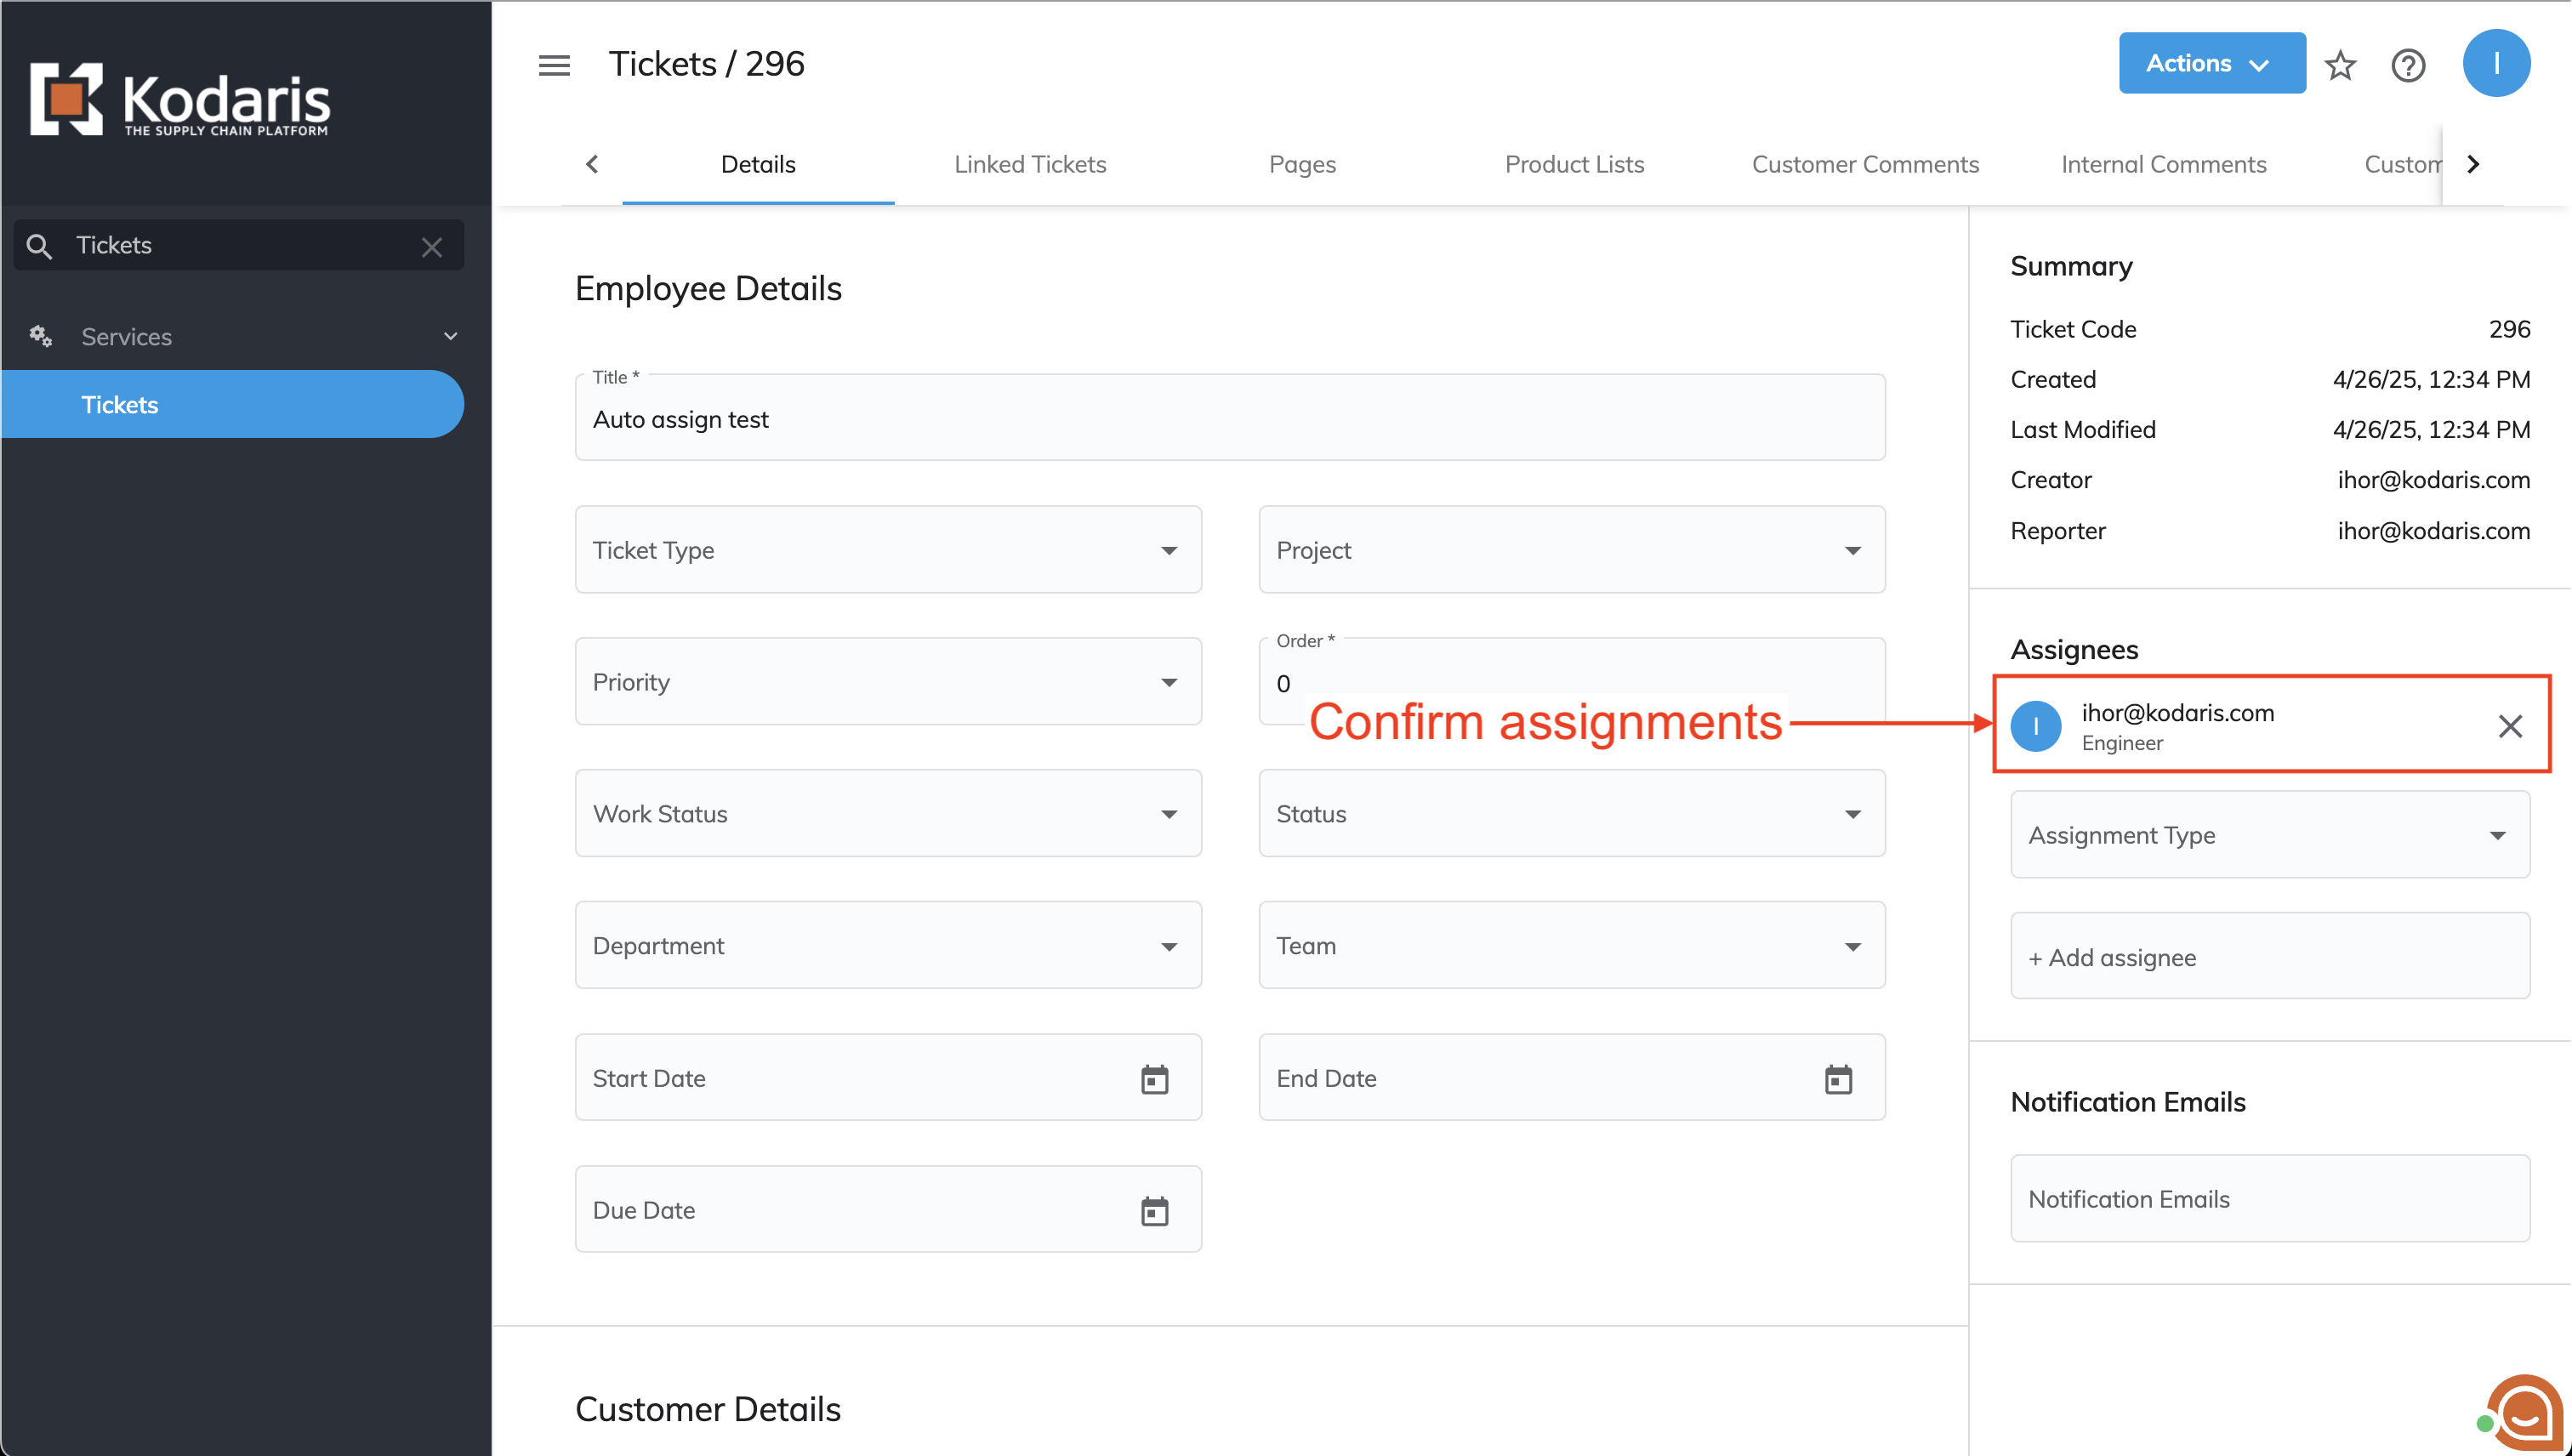
Let's examine an example where the interceptor modifies a newly created ticket by assigning its reporter, creator, and createdBy as ticket assignees.

From the newly created ticket object, information about the reporter, creator, and createdBy is retrieved. The code verifies that only unique values will be assigned - for example, if the reporter and creator are the same person, the system will only assign that person once.
After all new assignee information is collected, the code assigns each person to the ticket with an 'Engineer' assignee type. The system also logs each assignment action, which helps track and troubleshoot any potential issues.
To verify that the interceptor works as expected:
- Navigate to the tickets screen and click the '+' button in the top right corner.

- In the dialog box, enter a new ticket title and click the 'Add' button;

- After being redirected to the new ticket detail page, verify that the employee has been assigned to the ticket.
The functionality described above is implemented using the following code snippet:
var assignees = [];

if (assignees.indexOf(ticket.reporter) < 0) {
  assignees.push(ticket.reporter);
}

if (assignees.indexOf(ticket.creator) < 0) {
  assignees.push(ticket.creator);
}

if (assignees.indexOf(ticket.createdBy) < 0) {
  assignees.push(ticket.createdBy);
}

for (var i = 0; i < assignees.length; ++i) {
  kd.log('Assign employee to new ticket ' + (i + 1) + ' ' + assignees[i]);
  kd.api.fetch({
    method: 'POST',
    endpoint: '/api/system/ticket/{ticketID}/assignee/byUsername',
    pathParams: {
      ticketID: ticket.ticketID
    },
    queryParams: {
      version: 2,
      type: 'Engineer',
      administratorUsername: assignees[i]
    },
    body: {}
  });
}
jiraIssueInsertFromKodarisTicket.js
Execution
Swagger
The jiraIssueInsertFromKodarisTicket.js interceptor can be triggered through the Kodaris API by calling the endpoint: /api/system/integration/jira/issue/{ticketID}

ticketID - The ID of the Kodaris ticket to be converted into a Jira issue
alternativeIntegrationCode - iOptional parameter to specify a non-default Jira integration code for your system.

Operations portal
To create a Jira issue from Operations Portal:
- Navigate to the ticket's screen;

- Select and open the desired ticket's detail page

- Click 'Actions' > 'Create JIRA Ticket'

Roles
To create a JIRA ticket from an existing Kodaris ticket, employees must have at least one of these roles:
- administrator
- superuser
- ticketEdit
Pre-Execution
The interceptor begins by attempting to locate the ticket using the provided ID. If the ticket cannot be found in the system, the API will respond with a 'Bad Request' status, indicating the operation failed.
Once the ticket is located, the system generates variables for the interceptor's scope. Among these, the billableCompanyCode is retrieved either from the ticket directly or from its assigned company. If no billableCompanyCode is found in either location, the variable defaults to null
After billableCompanyCode and other variables are initialized, they are placed in the interceptor's scope, and the interceptor execution begins.
Goal
The jiraIssueInsertFromKodarisTicket.js interceptor's primary function is to construct the request body required for creating an issue via the Jira API by mapping fields from the Kodaris ticket to their corresponding Jira issue fields..
The interceptor comes with documented default code that includes comments showing available scope variables and Jira field examples. It also provides basic mapping for essential fields: project, issue type, summary, and description.

Post-Execution
Once the interceptor completes the field mapping, the data is sent to the Jira API. After receiving confirmation of successful issue creation, the Kodaris system performs two actions: it synchronizes the new Jira issue and adds an internal comment to the original ticket containing a link to the created Jira issue.
processDefaultEmail.js
This interceptor, rather than being triggered by an endpoint call, is automatically executed by the Kodaris system during the processing of incoming emails.
Pre-Execution
The system will automatically create tickets from received emails when 'convertReceivedEmailsToTickets' is set to '1'.

The interceptor receives access to the current email and its associated ticket (if one exists)
Goal
The interceptor's main purpose is to process incoming emails correctly and update the associated ticket when necessary.
